


Good Morning all..
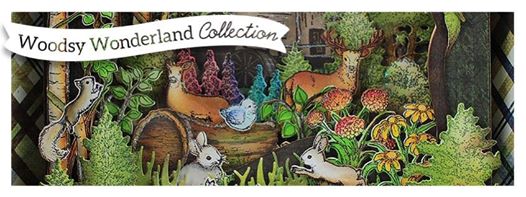
Again it’s time to share Wednesday inspiration for Heartfelt Creations. It’s also a new release day and all we designers are here to take an adventure on the path less traveled and lose yourself in an enchanting woodsy wonderland filled with magnificent wildlife, beautiful scenic expanses and delicate field flowers.
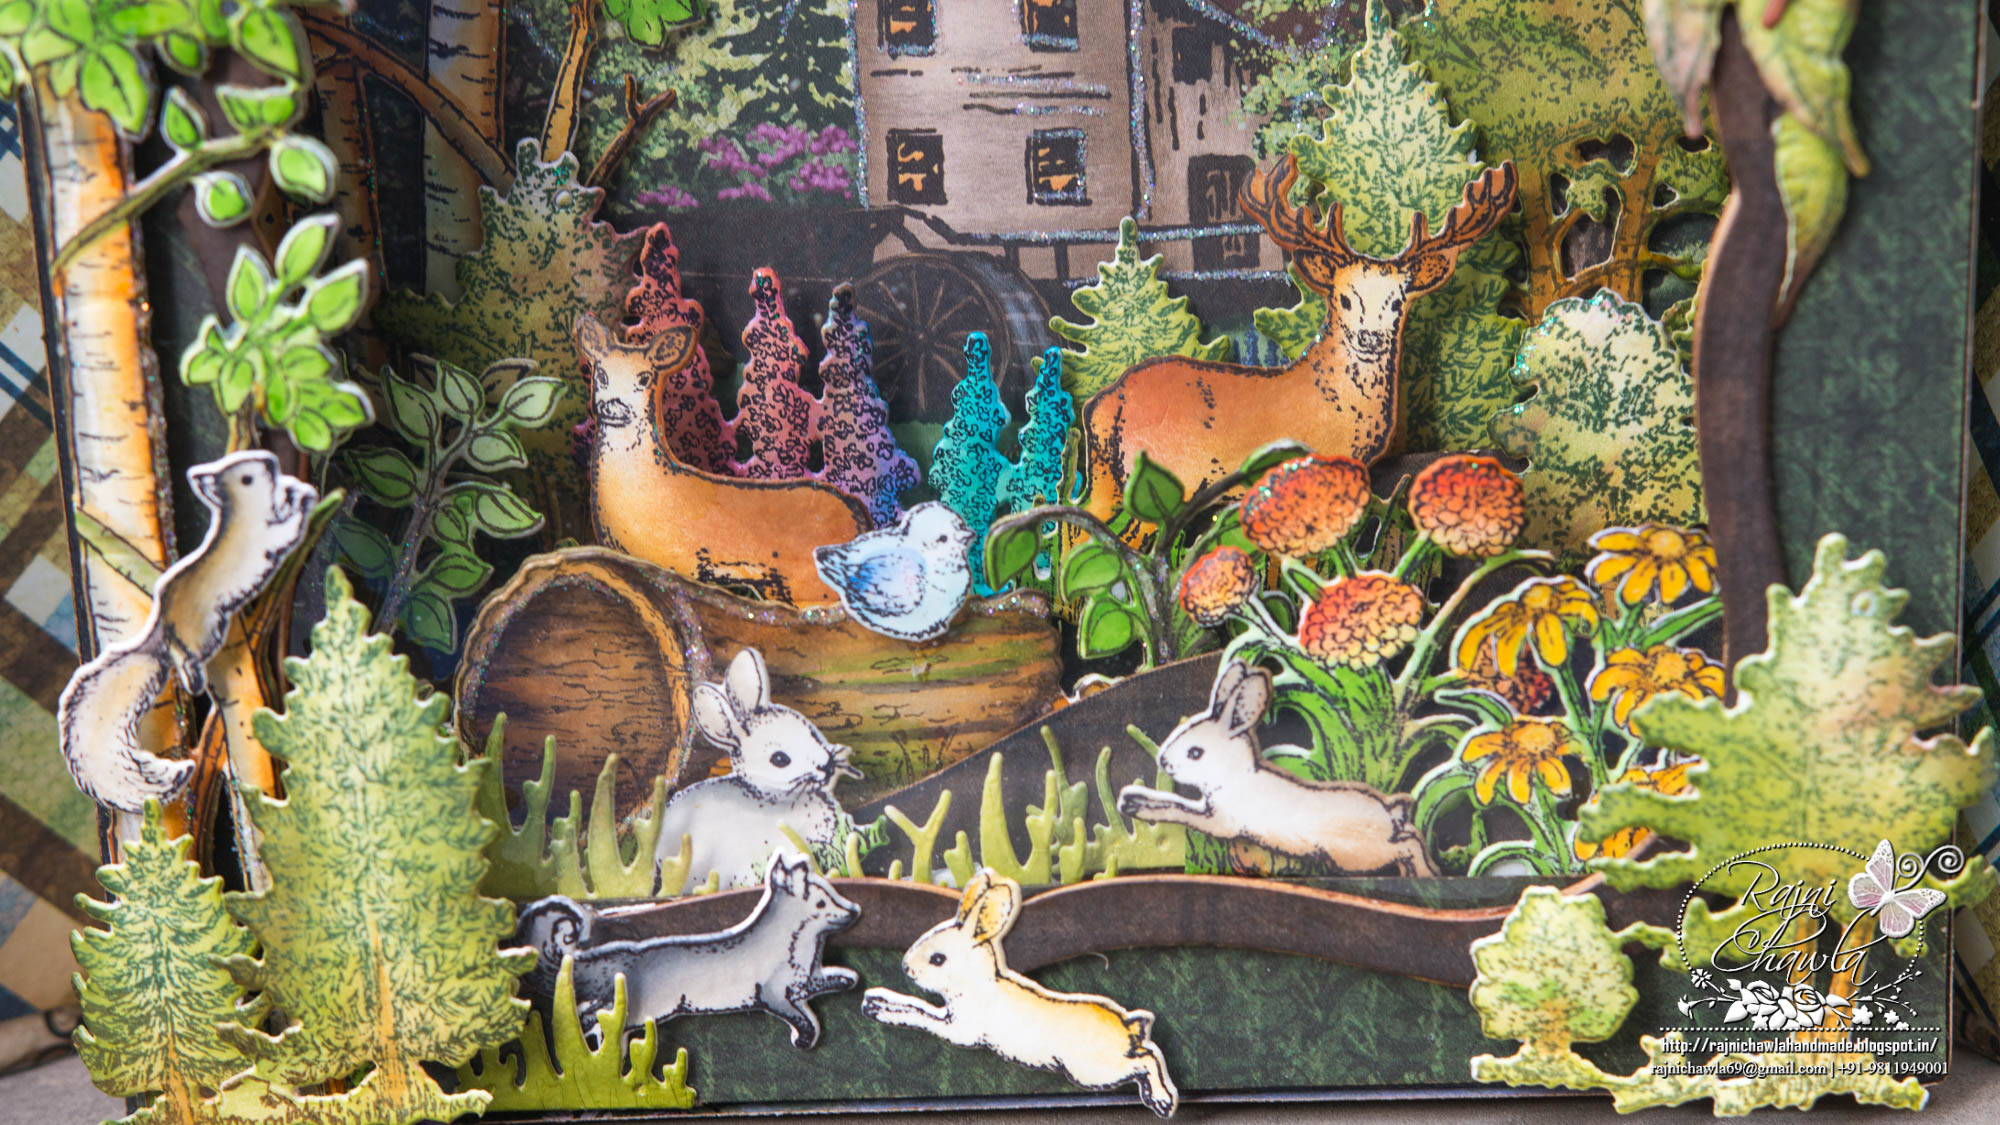
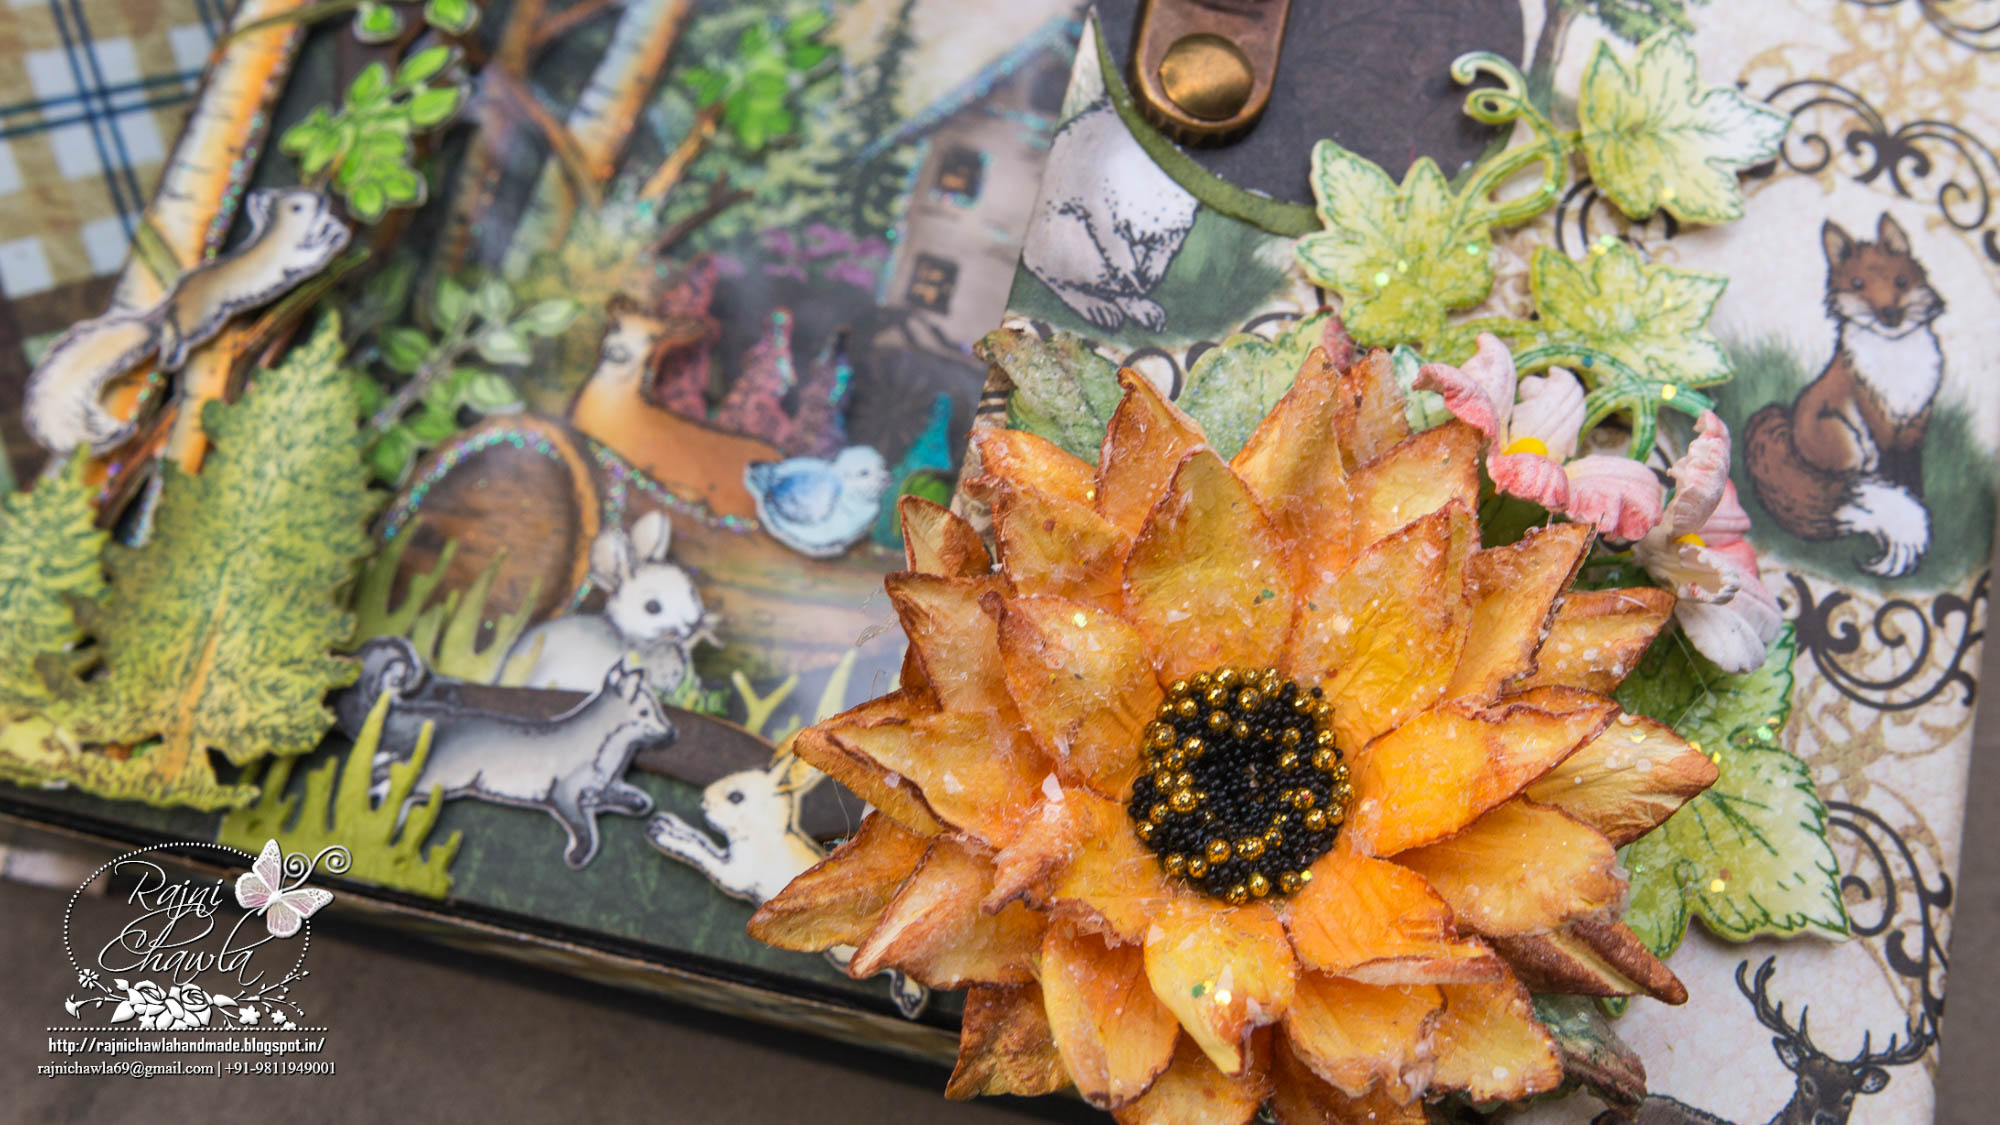
Heartfelt Creations invites you to explore the new Woodsy Wonderland Collection. Step softly as to not spook the peaceful inhabitants or trample the native wildflowers as you set about exploring your surroundings. Immerse yourself in a stunning paper collection showcasing a beautiful outdoor themed color palette of rushing river blues, orange and yellow sunset hues, grass like greens accented with the softest wildflower whites, deep purples, and posy pinks, pulled together and grounded with dark tree bark browns, sky blues and moss like greens. Discover charming cottages, babbling brooks, and grassy fields boasting home to majestic deer, chattering squirrels, prancing skunks and frolicking foxes. Bold stripes and crosshatch patterns will remind you of trampled wildlife trails, creating eye catching backgrounds for the tiny woodland creatures depicted on the varying sizes of premade card panels or within the three extremely detailed and realistic forest themed cling stamp sets which provide the ideal elements for creating your very own woodsy wonderland on your next paper crafting project. Pair with the coordinating dies to create dimensional forest scenes laden with fallen tree stumps, grassy knolls, darting rabbits, scampering raccoons, decorative butterflies and song filled birds all at play in majestically treed forests! So, breathe deeply, exhale and allow the beauty of our enchanting woodlands to bring a sense of wonder, calm and peace to your soul as you craft your cares and worries away in the tranquility of our Woodsy Wonderland Collection.

Products from Heartfelt Creations
HCCF1-445-1 6″x 6″ Foldout Cards-Black
HCD1-7122 Woodsy Landscape Die
HCD1-7123 Woodsy Wonderland Die
HCD1-7124 Woodsy Critters Die
HCPC-3766 Woodsy Treescape Cling Stamp Set
HCPC-3767 Woodsy Wonderland Cling Stamp Set
CPC-3768 Woodsy Critters Cling Stamp Set
IHCD1-772 taliana Grapevines Die
HCPC-3696 Italiana Grapevines Cling Stamp Set
Classic Sunflower Die HCD1-753
HCD1-778 Fleur Borders and Pockets Die
HCD1-7109 Gift Box and Mini Snowflakes Die
HCPC-3626 Classic Sunflower Cling Stamp Set
HCD1-7119 Classic Border Basics Die
Other products used: Archival inks- leaf green, Olive green, Black, Plum, Sunflower, Rose Madder, Crystal Clear glitter, A brass lock, Zig Clean Clear Brush Markers, Koi water color brush, white card stock, Block chipboard, Red tacky tape, Adhesive that dries clear, foam tapes. Spellbinder’s Grand Label one, Sore board.
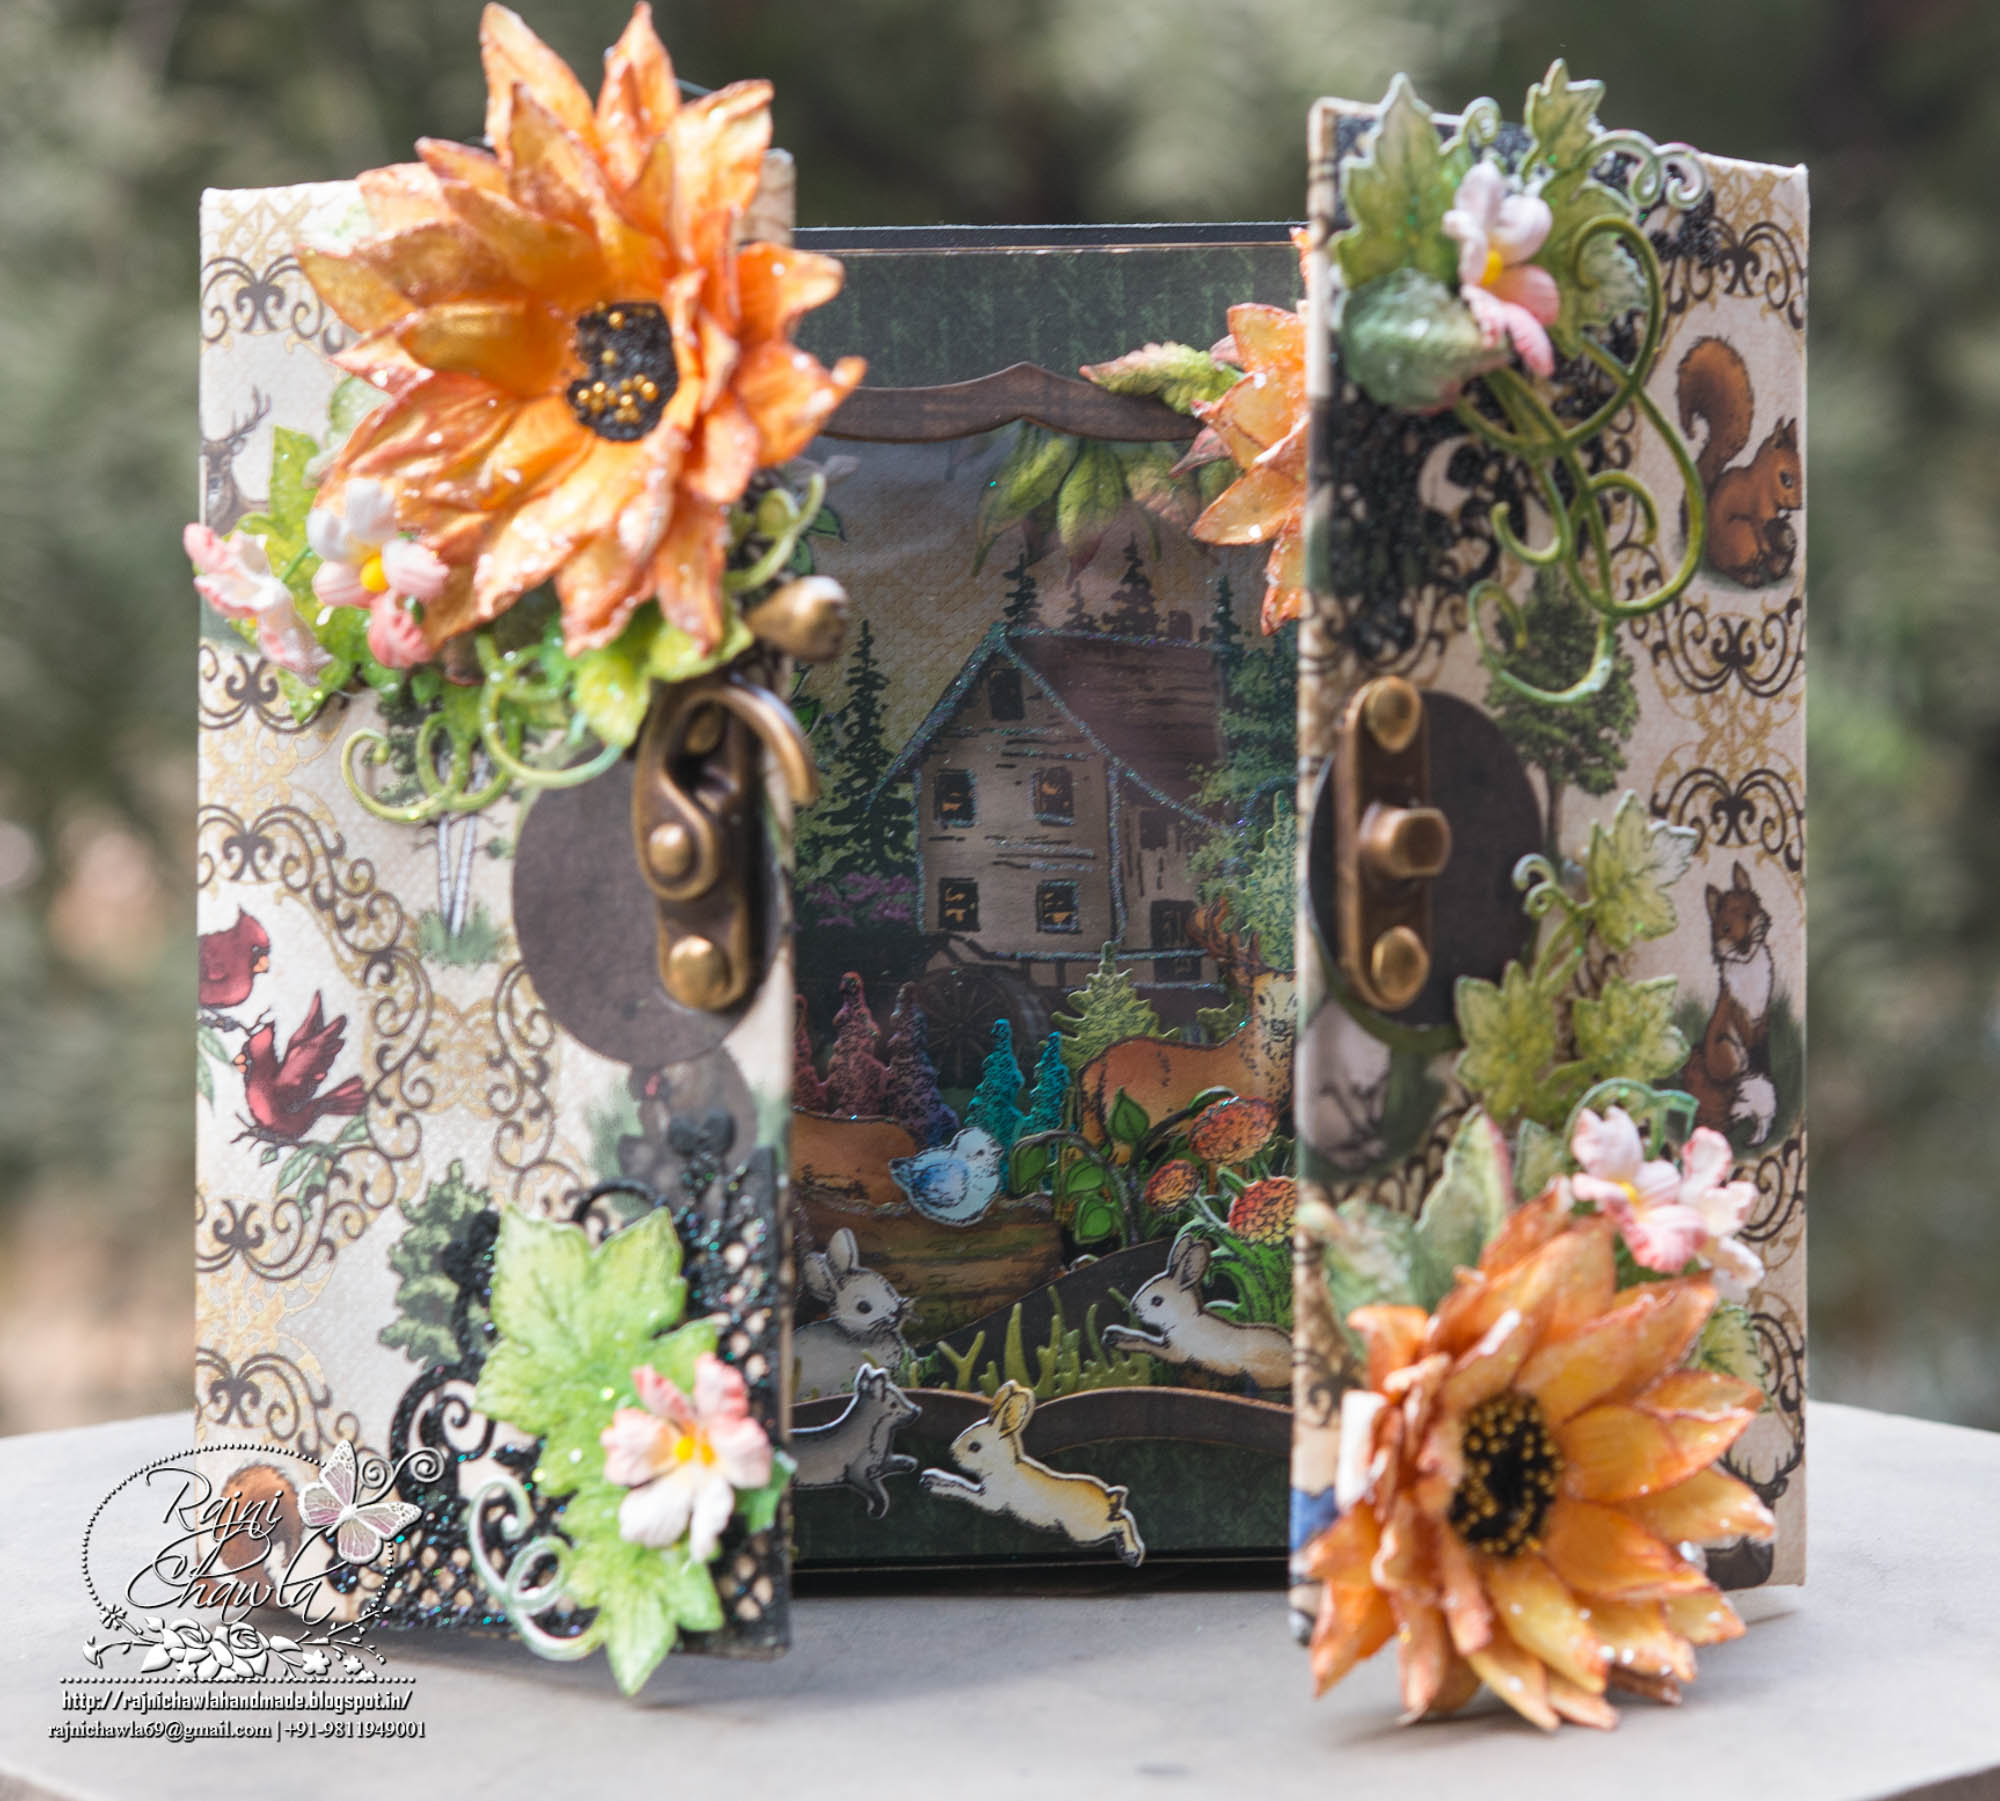
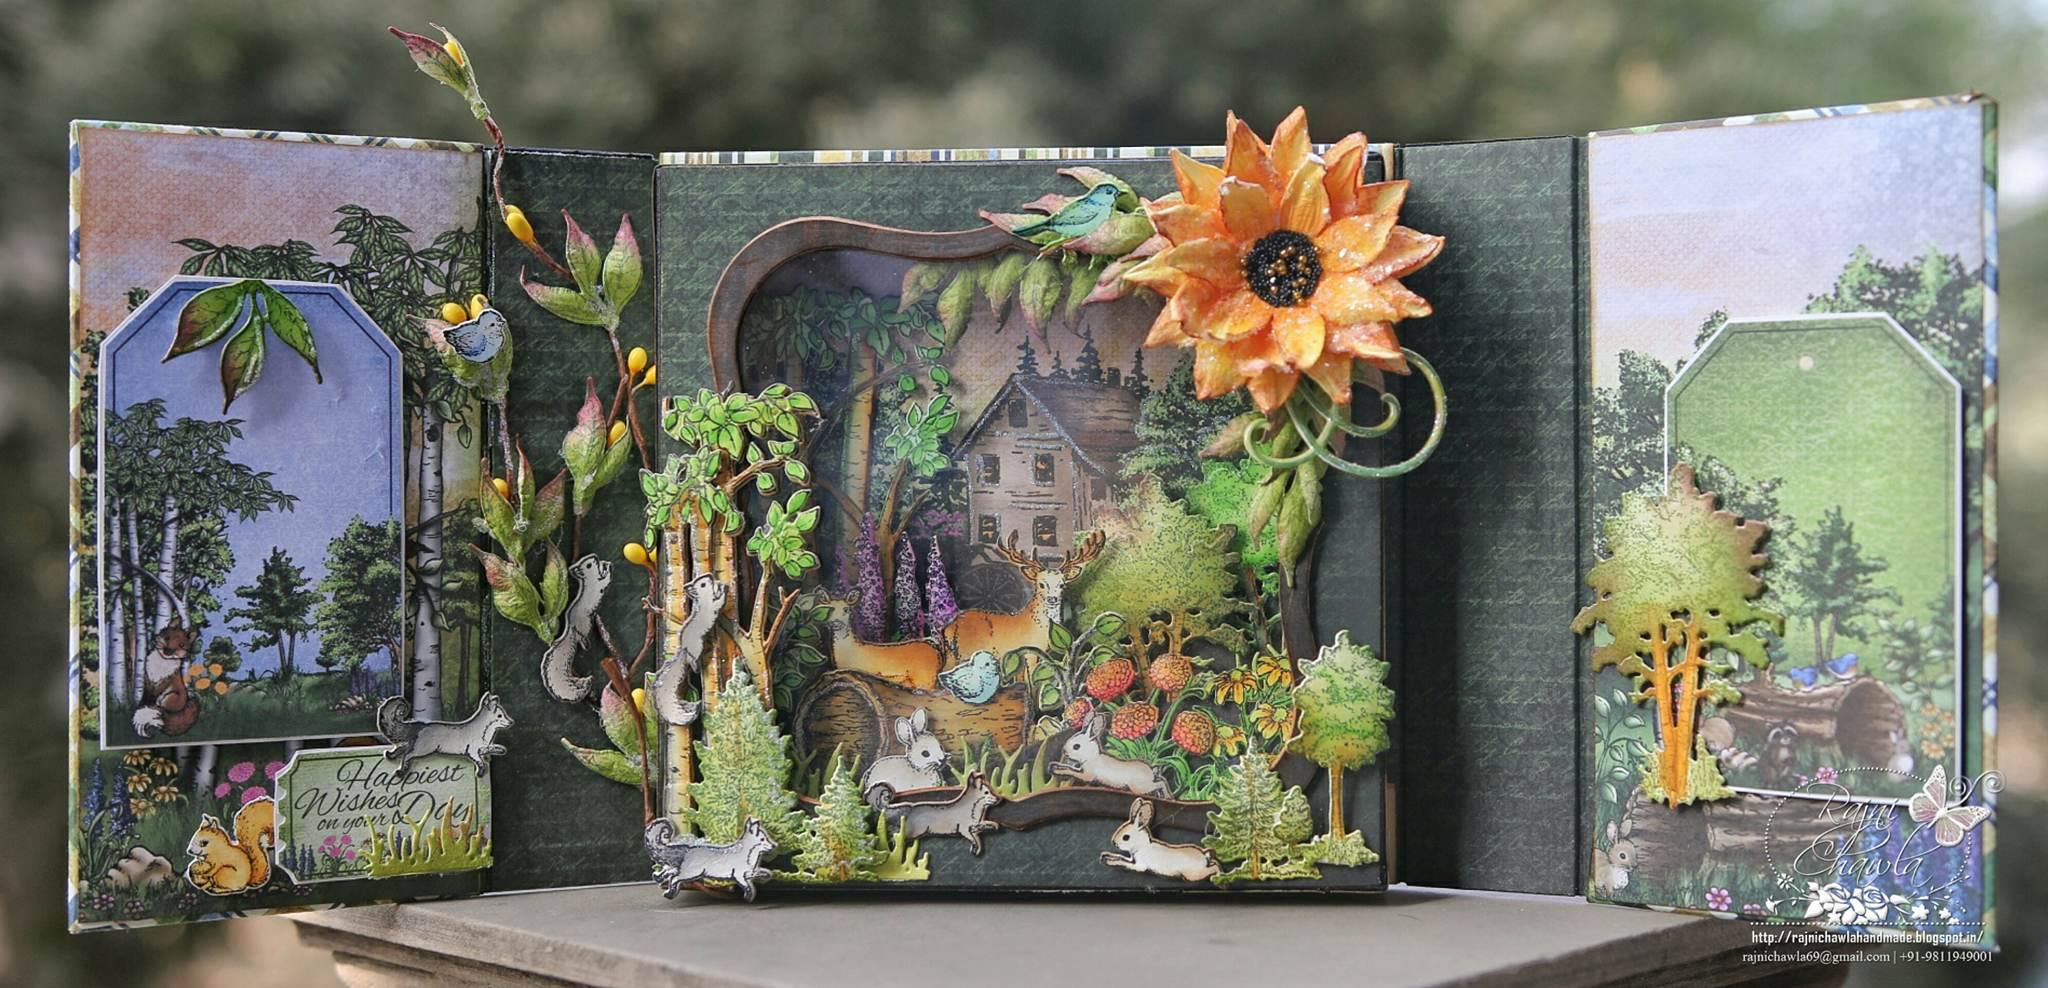
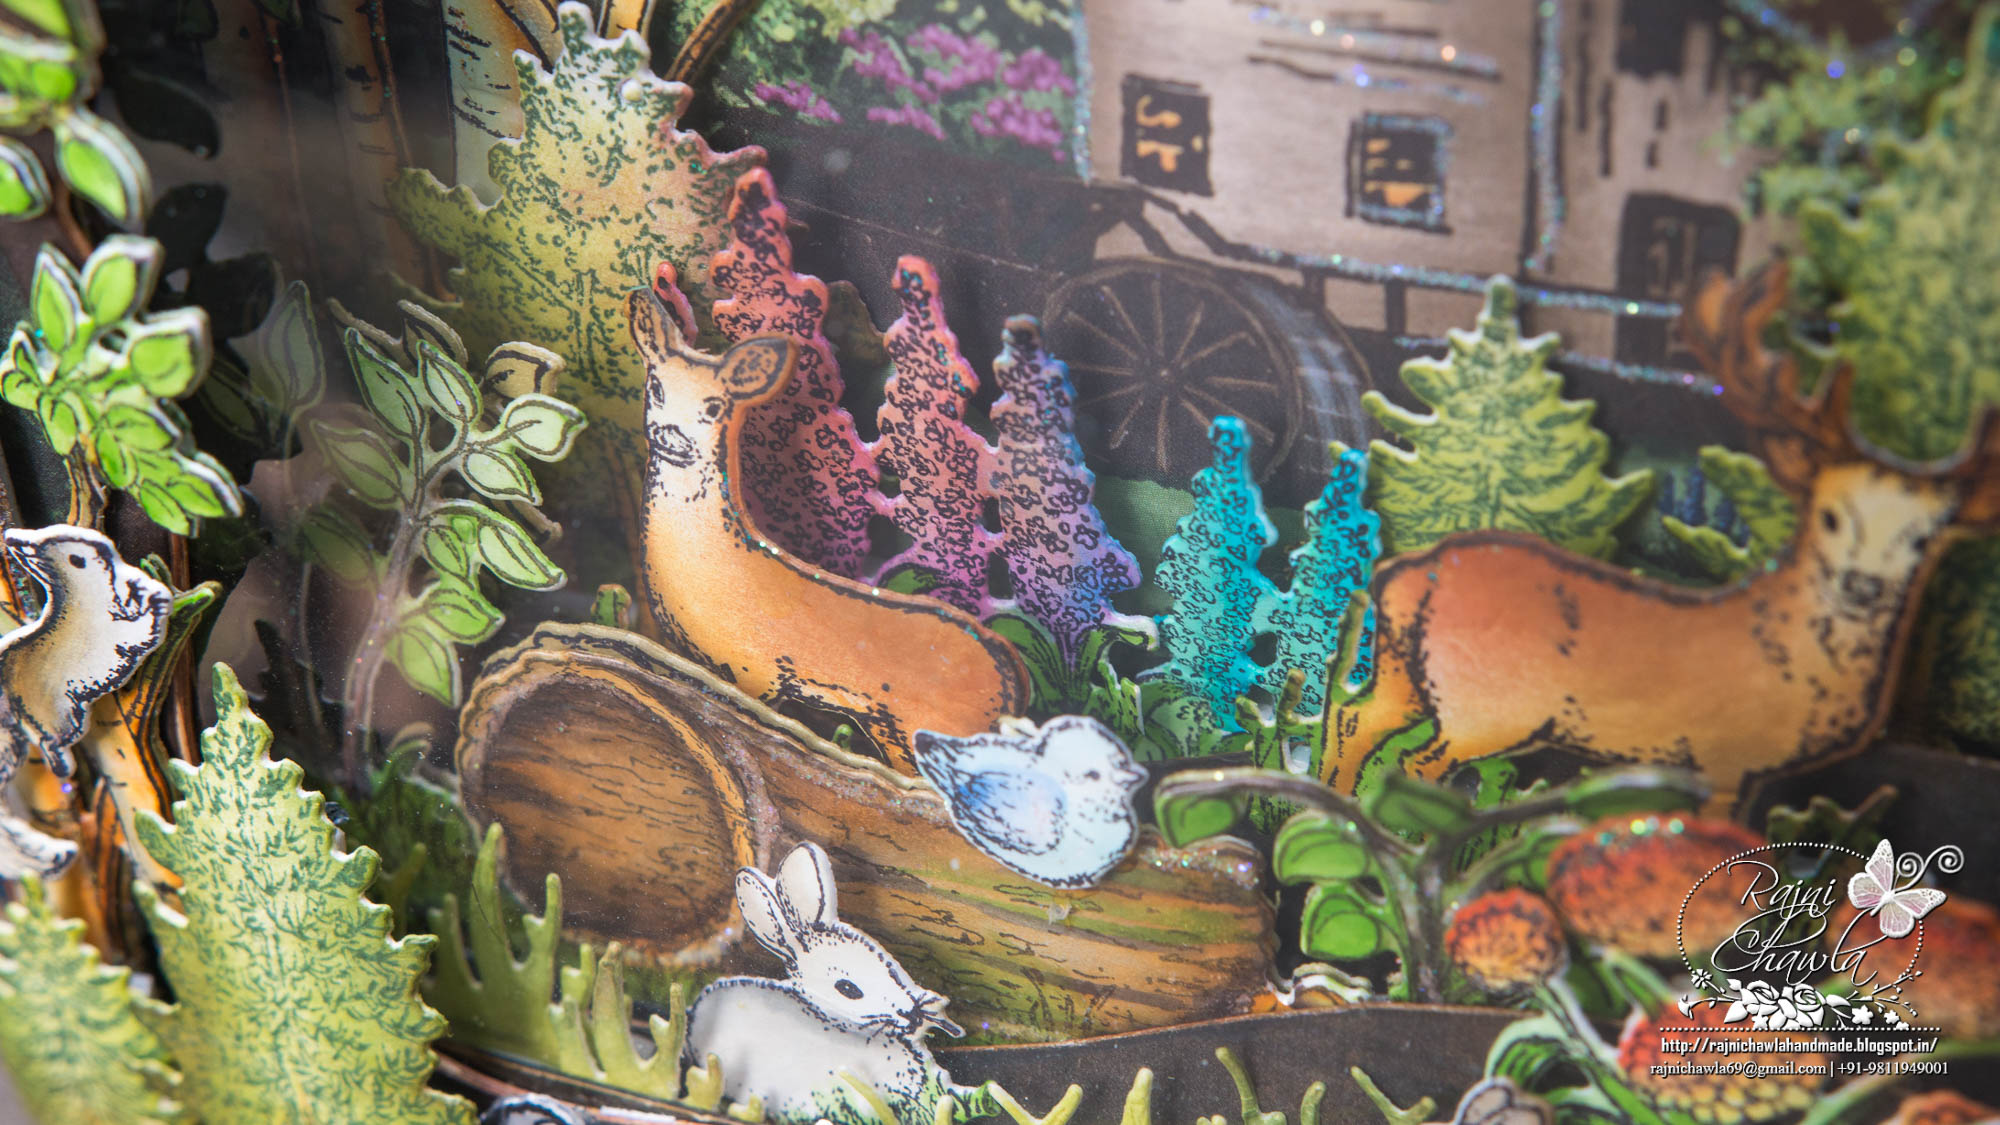
Instructions: For the inside box fold card I have used 6′ x 6″ Black fold -out card.Choose the pattern paper for inside panel of the box. Cut to size and paste it in the box using glue. Highlight the images randomly with glitter. Stamp all the critters using brown archival ink on white cardstock. Paint all the images with Zig Clean Clear Brush markers. Cut all the images with their coordinating dies. and add a little glitter. All the trees are stamped using leaf green archival and painted with olive green archival inks and a little touch of Library green and Plum. Leaves are stamped using Library green archival and painted with Leaf green and olive green. On the edges use Plum randomly. Leaves are also embossed using Delux Flower shaping kit. Once all the elements are painted and cut Cut 3 pieces of dark green pattern paper with Classic Basic Border Die.
Arrange the pieces inside the box forming peaks and valleys. Cut a long strip of a green strip of card stock and die cut multiple times usingIcicless die from Snow Kissed Collection. These are used to give a look of grass to cover the empty spaces between all the critters. Once you decide how to place the elements layer them using foam dots. Glue down the whole box. Now cover all the sides of the box except the back with designer paper from same collection. For window cut a frame using 2nd and 3rd die of Spellbinder’s Grand Label One. Adhere acetate sheet on the back of the frame. Glue few embossed and glittered leaves inside the box on right hand corner. Close the box with window frame using red tacky tape. The ready box measures 7″ X 6 3/4″ X 1 1/2″. For the Outer Jacket of the box you will need 2 pcs of 3 1/2′ X 7( front panels), 1 piece of 7′ ‘x 6 3/4′ ( back) and 1 1/2′ X 7 ” (spine) of black thick chipboard. For hinges you need 7′ X1′ strip of black card stock, scored at 1/2’. Form a jacket by joining hinges to all the joints using red tacky tape. Cover all the sides with designer paper and decorate the outer of the box with sunflowers,leaves and Pocket and Border die. . For coloring and shaping sunflowers, chk Emma’s video ( insert the video link). I have also used Grapevine leaves from itliana Raviera Collection.For closing the box, I have used a brass lock.
Rajni, this is stunning, love how you created a fold out card on the box, brilliant idea.
Wow gorgeous work!!
Hi, this must have taken a few hours…lol..well worth it..STUNNING! Hugs
Gorgeous work!! The flowers, the cute little animals – everything looks beautiful.
Cheers
Preety
Awesomeness at its best..
An absolutely charming,realistic collection.
Oh my goodness, just as always I love your creation! I’m a huge fan of Sunflowers and yours is amazing. I cannot say enough about your creativity. Wish I could sit next to you while you create!
An amazing design, Rajni! A true feast for the eyes…I feel like I am exploring in the woods looking for wildlife and flower surprises as I gaze on all of the little details!
I love your gorgeous gate-fold shadowbox card! It is beautiful.
Hugs, Marie
What an amazing creation and a wonderful gift!
This is gorgeous!! Love it!!