


WELCOME TO BLACK FRIDAY RELEASE BLOG HOP
Can you believe…..it’s November already and Black Friday is just 2 days away!!
We all designers and behind the scenes teamies are super esxcited to share few sneek peeks for Heartfelt Creation’s another FANTASTIC BLACK FRIDAY RELEASE. We are having a big blog hop going on our blogs and also we welcome you all to join us along if you really want to peek through the new release.
Stamps…dies….Ah..!!
Their is lots more in this year’s Black Friday Release.
Are you ready guys??
Hop along and win fabulous prize by Heartfelt. You can find the complete list of participants of the hop in the end of this post. Remember to leave a comment on as many of our blogs as you can as to win fabulous Black Friday Releases.
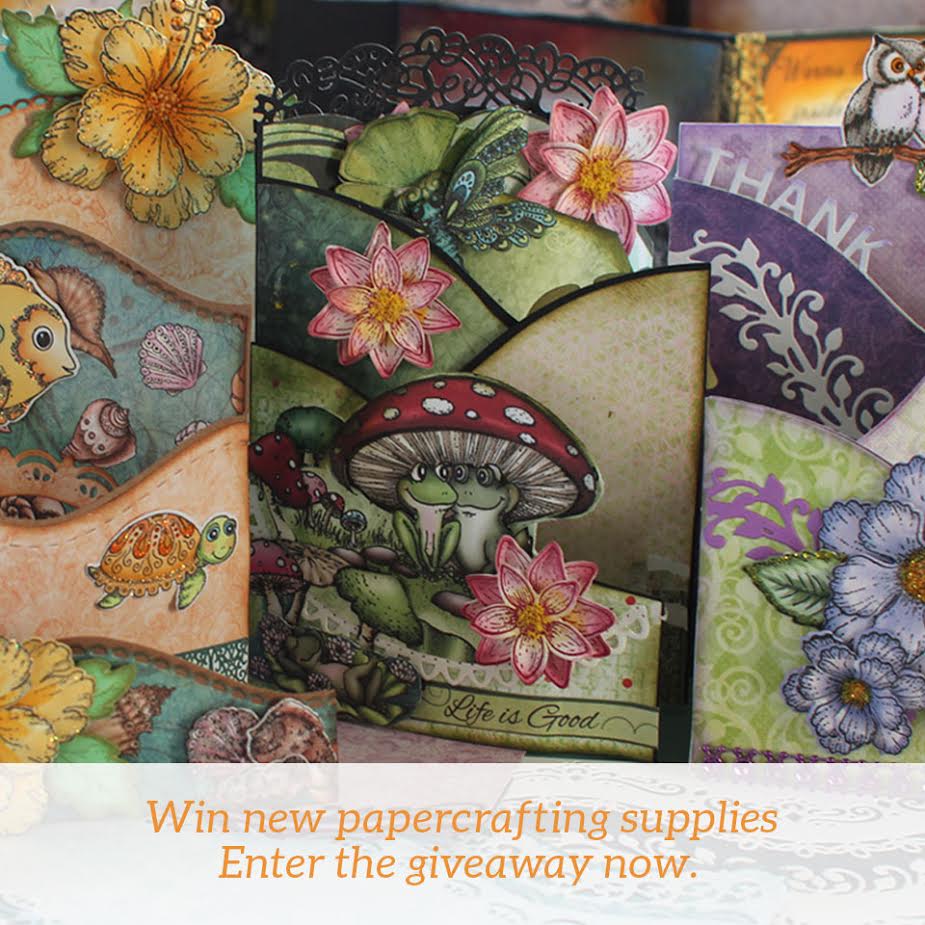
Have a glimpse of the new release that you are going to win . I am sure…. you will love it all.!!
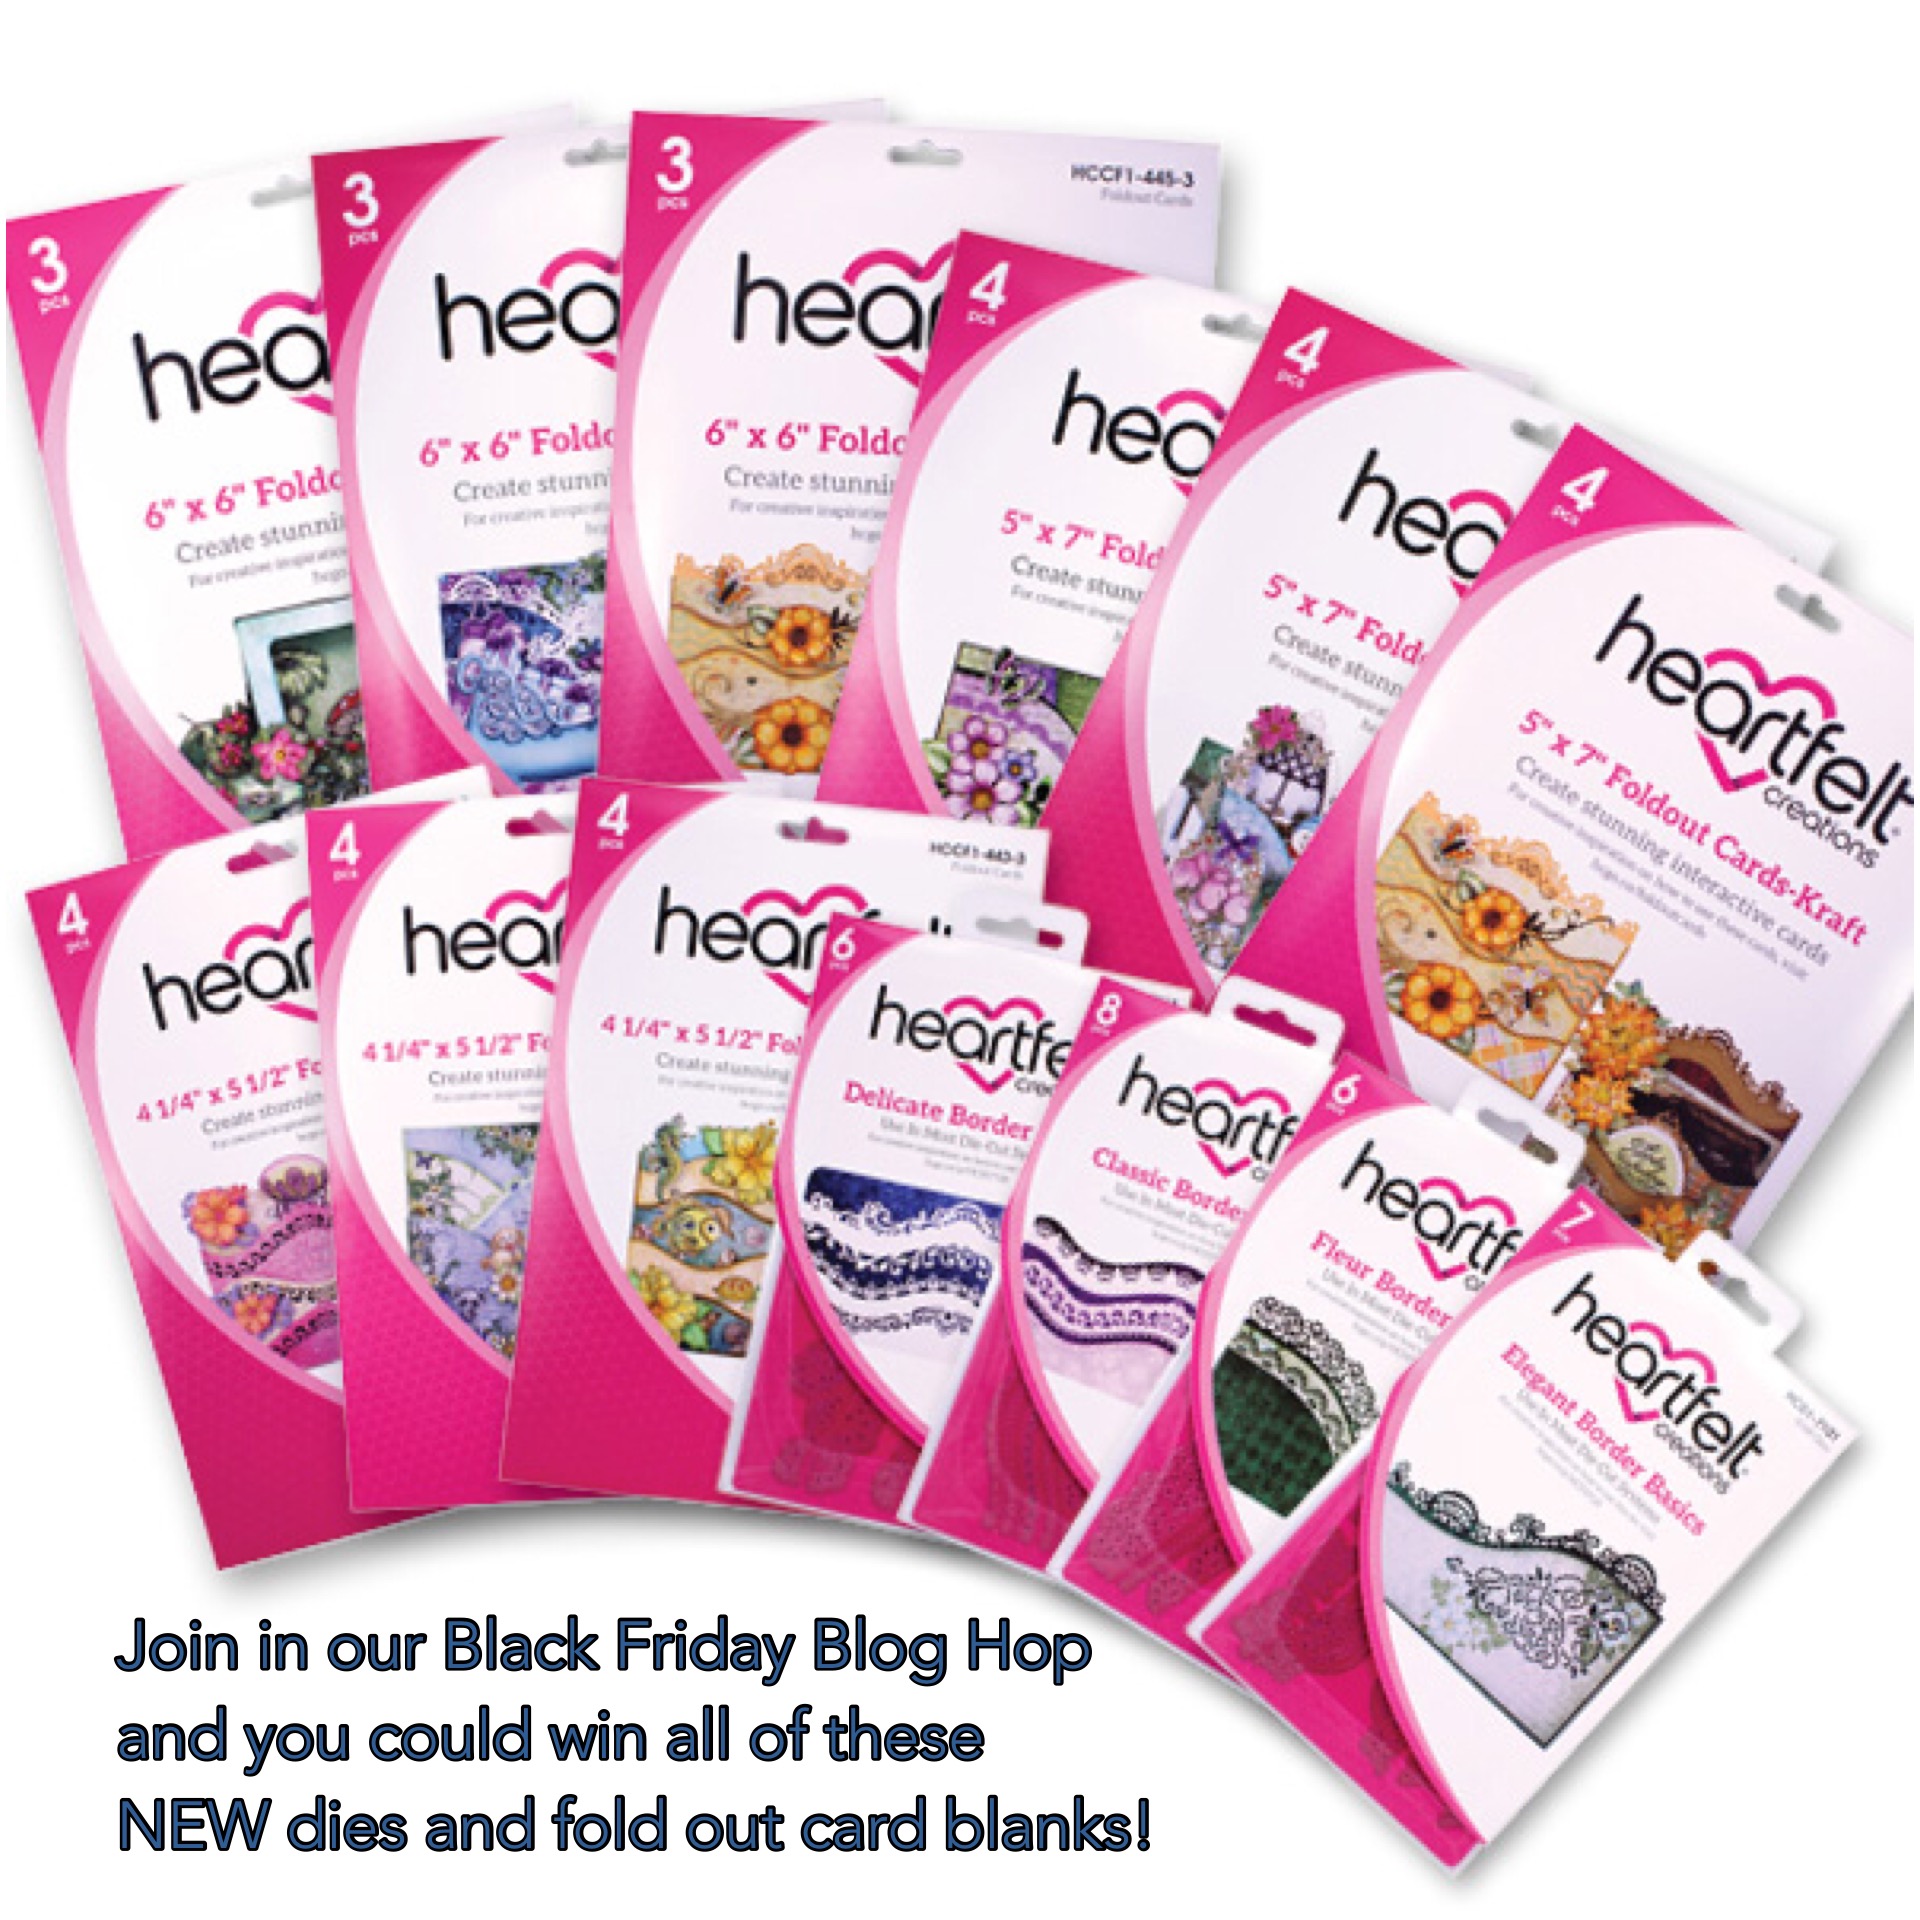
Here is the list of all supplies which any one of you can win.
1x Delicate Border Basic Die
1 x Classic Border Basics Die
1 x Fleur Border Basics Die
1 x Elegant Border Basics Die
1 x pack of 4 1 1/4″ x 5 1/2″ Foldout cards Black
1 x pack of 4 1 1/4″ x 5 1/2″ Foldout cards White
1 x pack of 4 1 1/4″ x 5 1/2″ Foldout cards Kraft
1 x pack of 5″ x 7″ Foldout cards Black
1 x pack of 5″ x 7″ Foldout cards White
1 x pack of 5″ x 7″ Foldout cards Kraft
1 x pack of 6″ x 6″ Foldout cards Black
1 x pack of 6″ x 6″ Foldout cards White
1 x pack of 6″ x 6″ Foldout cards Kraft
Please note, the hop finishes on Monday 28th November at 11.59pm A winner will be chosen at random from the comments on all blog hop posts.
and the winner will be announced on the HC blog post and Facebook on Wednesday 30th November.
Now on to my Wednesday inspiration. I have 2 projects to share with new Black Friday release.
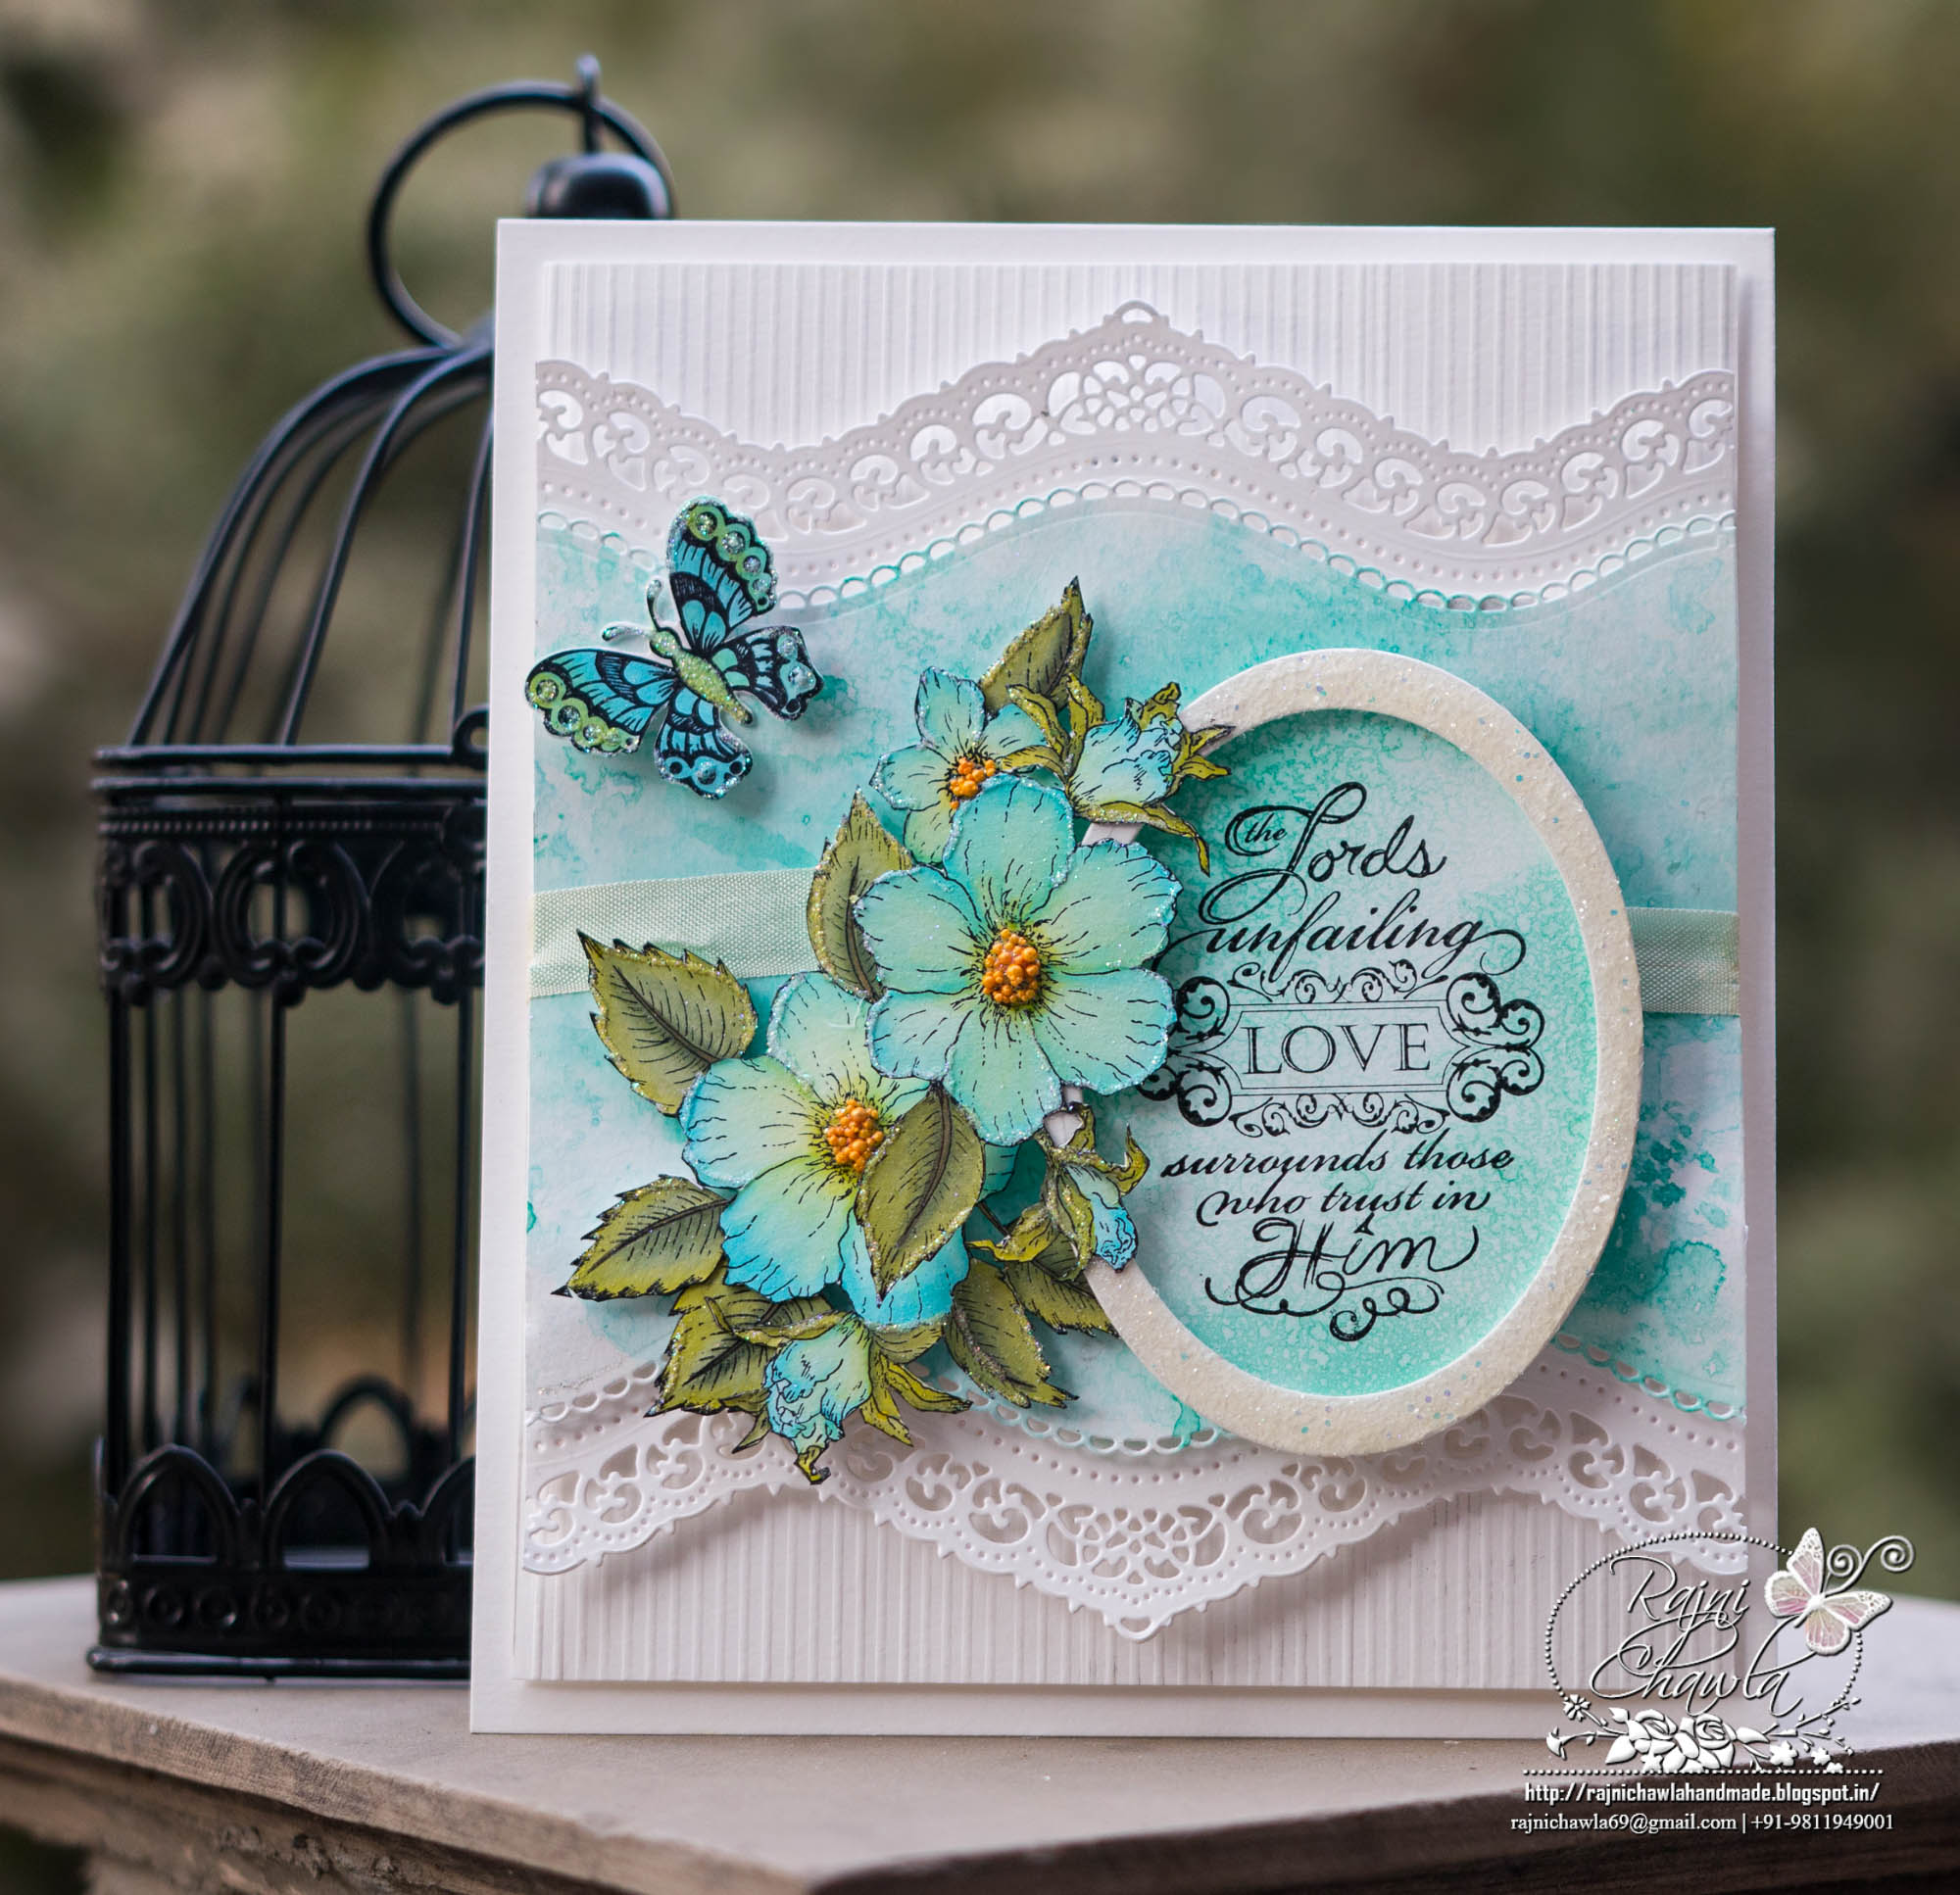
Products Used from Heartfelt Creations:
Classic Border Basics: HCDI 7119
Courage and Strength : HCPC 3763
Botanical Rose Bouquet Cling Stamp Set HCPC-3653
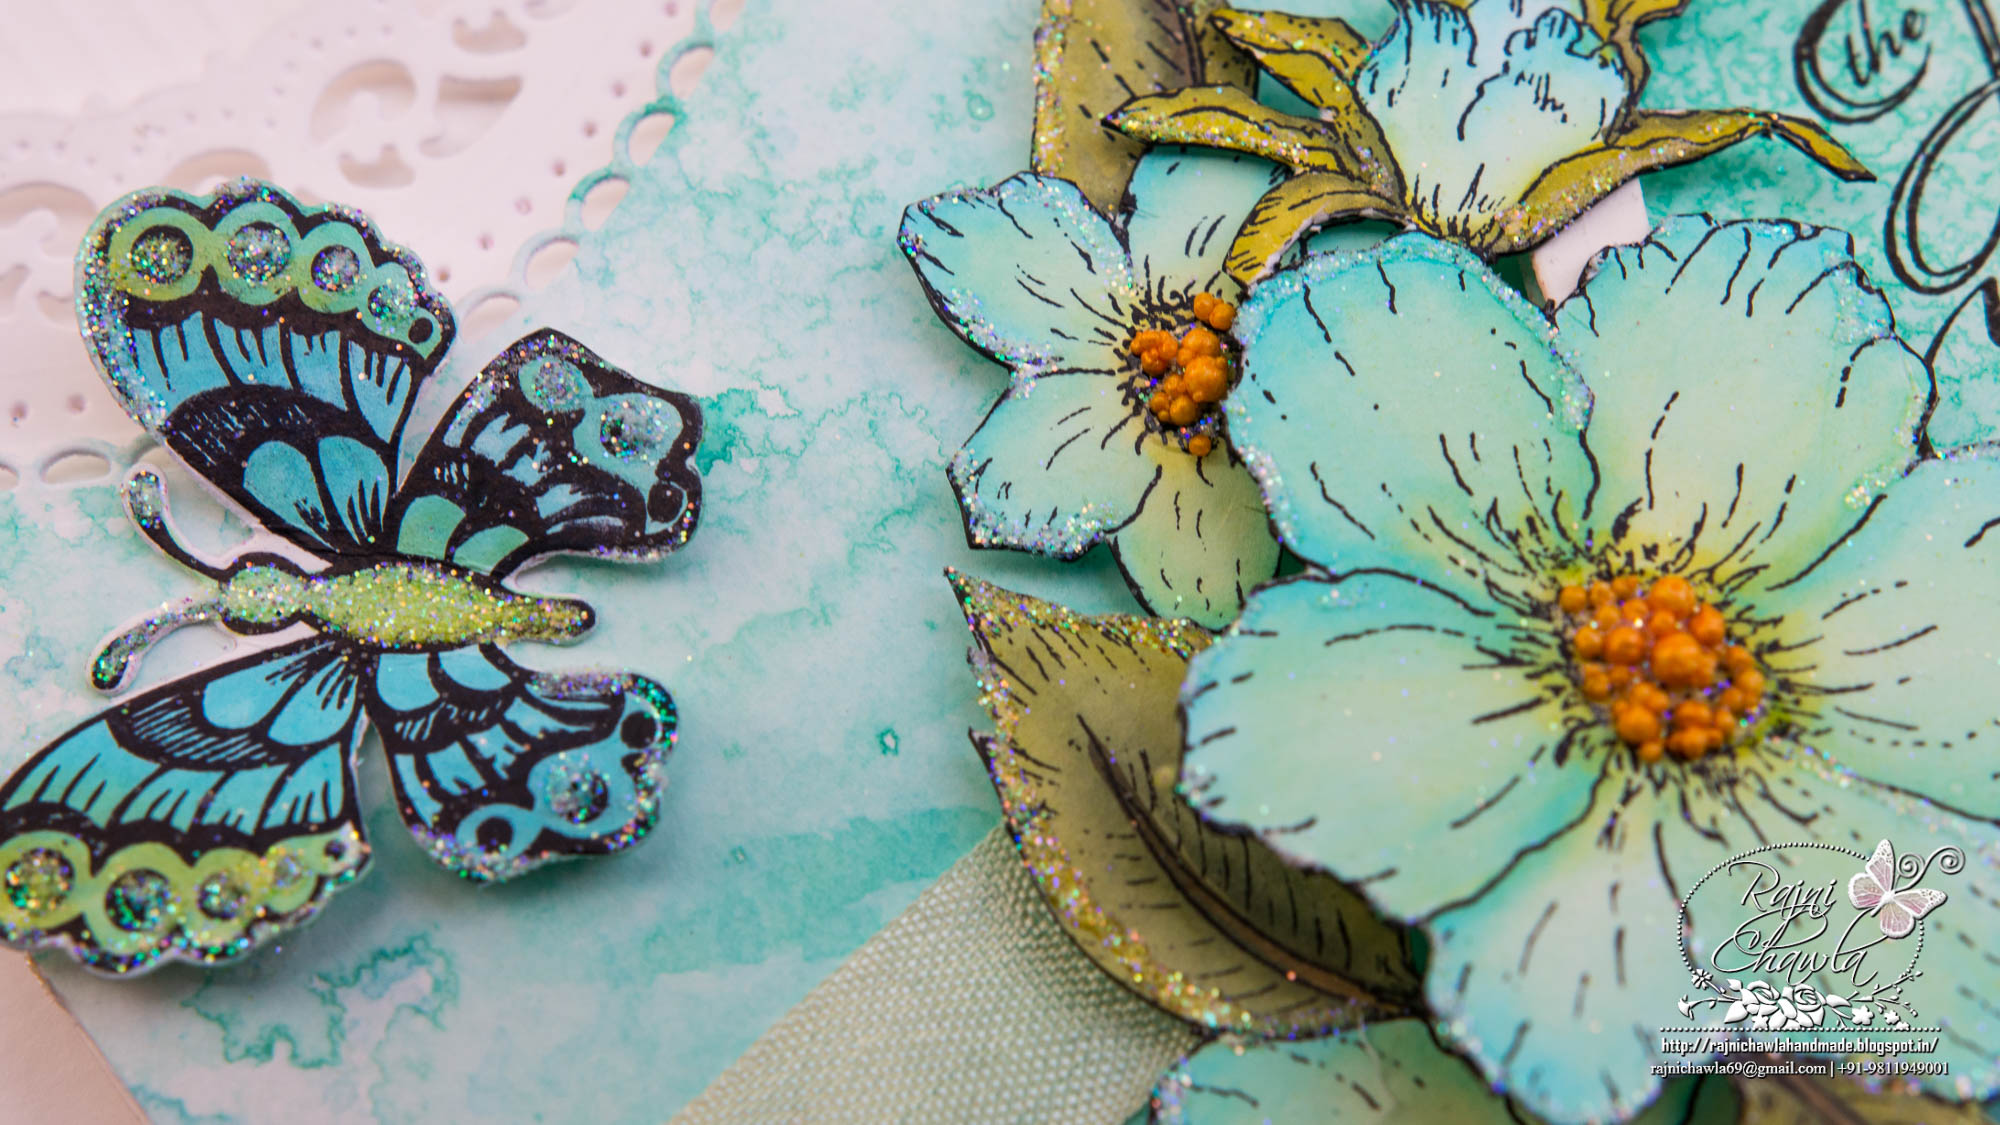
Botanical Wings Cling Stamp Set HCPC-3652
Butterfly Medley Cling Stamp Set HCPC-3650
Go Man Go Prills ANC818
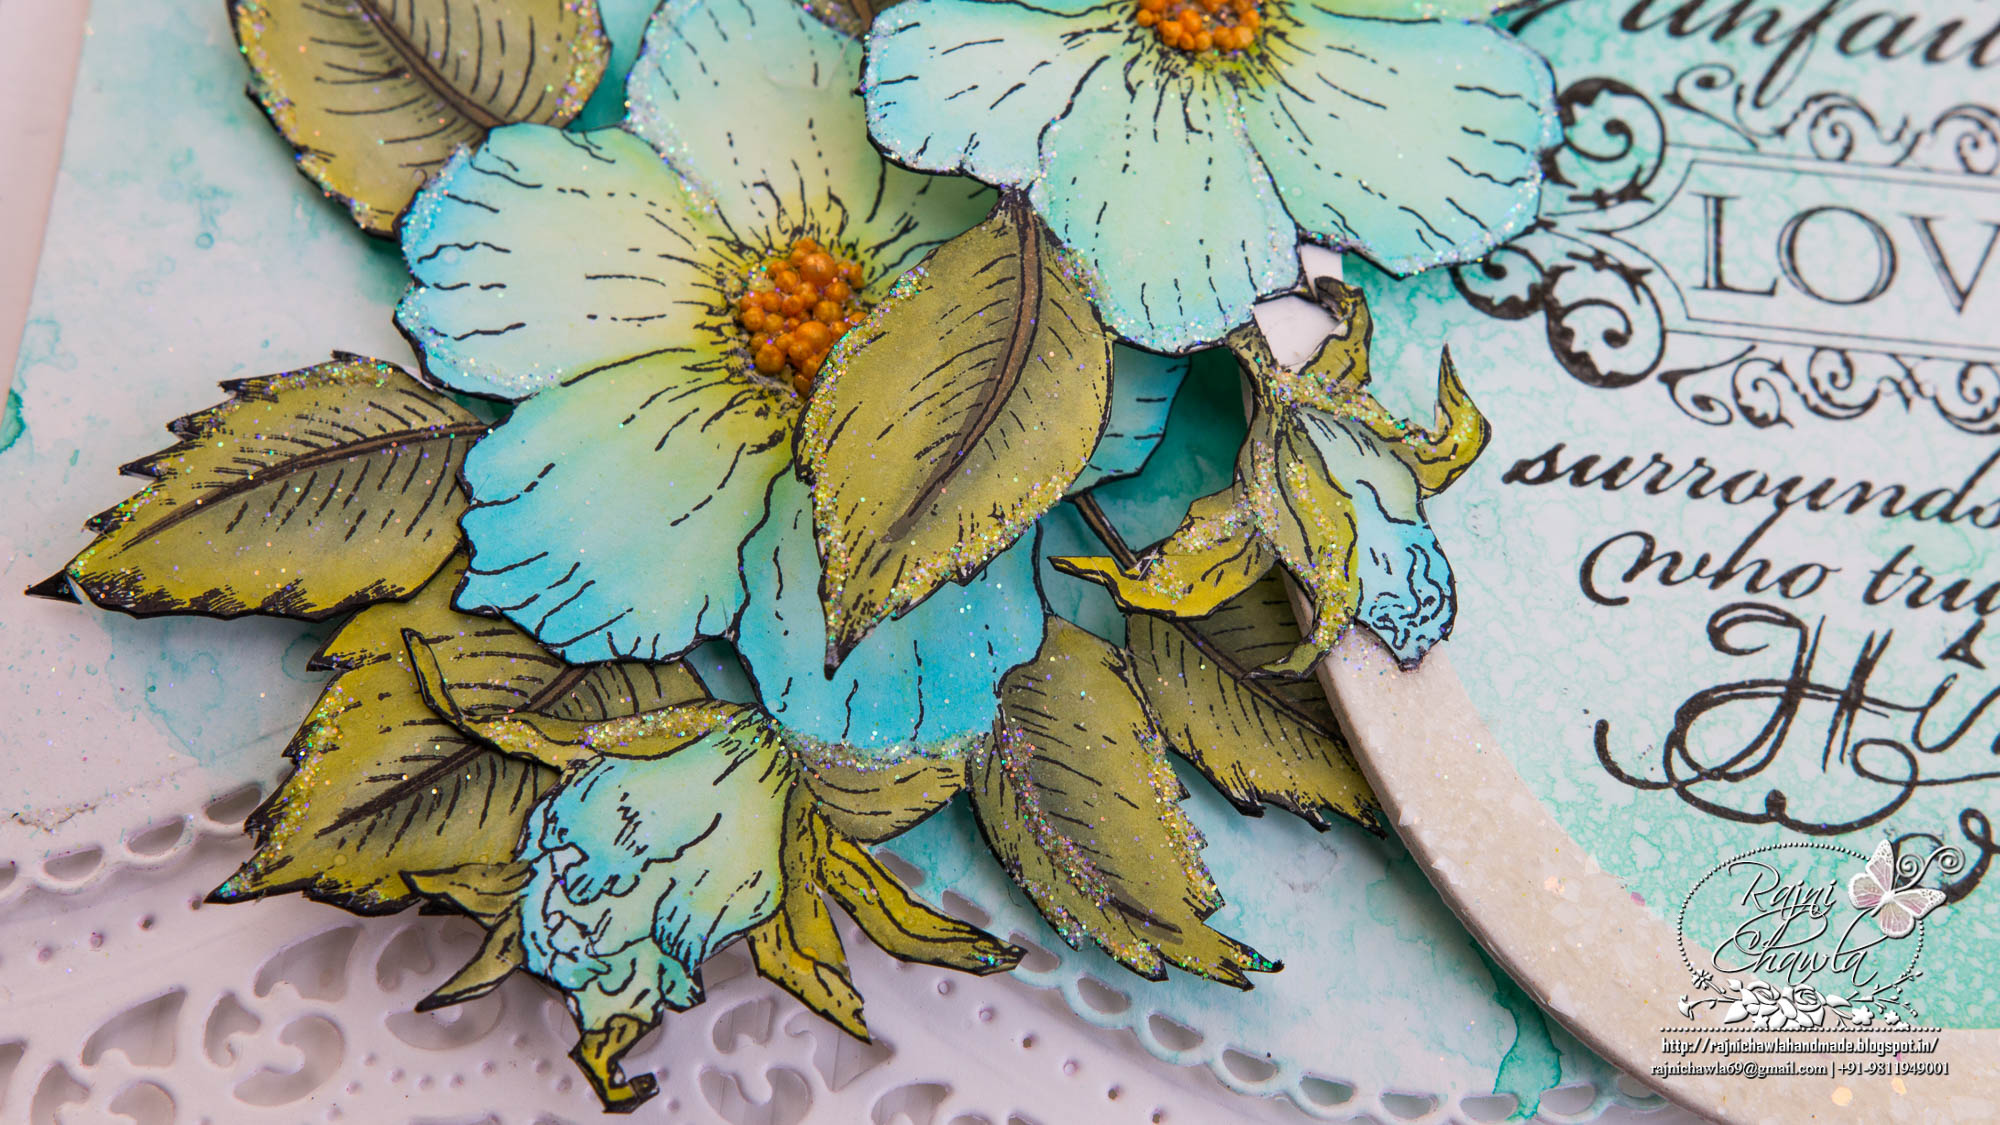
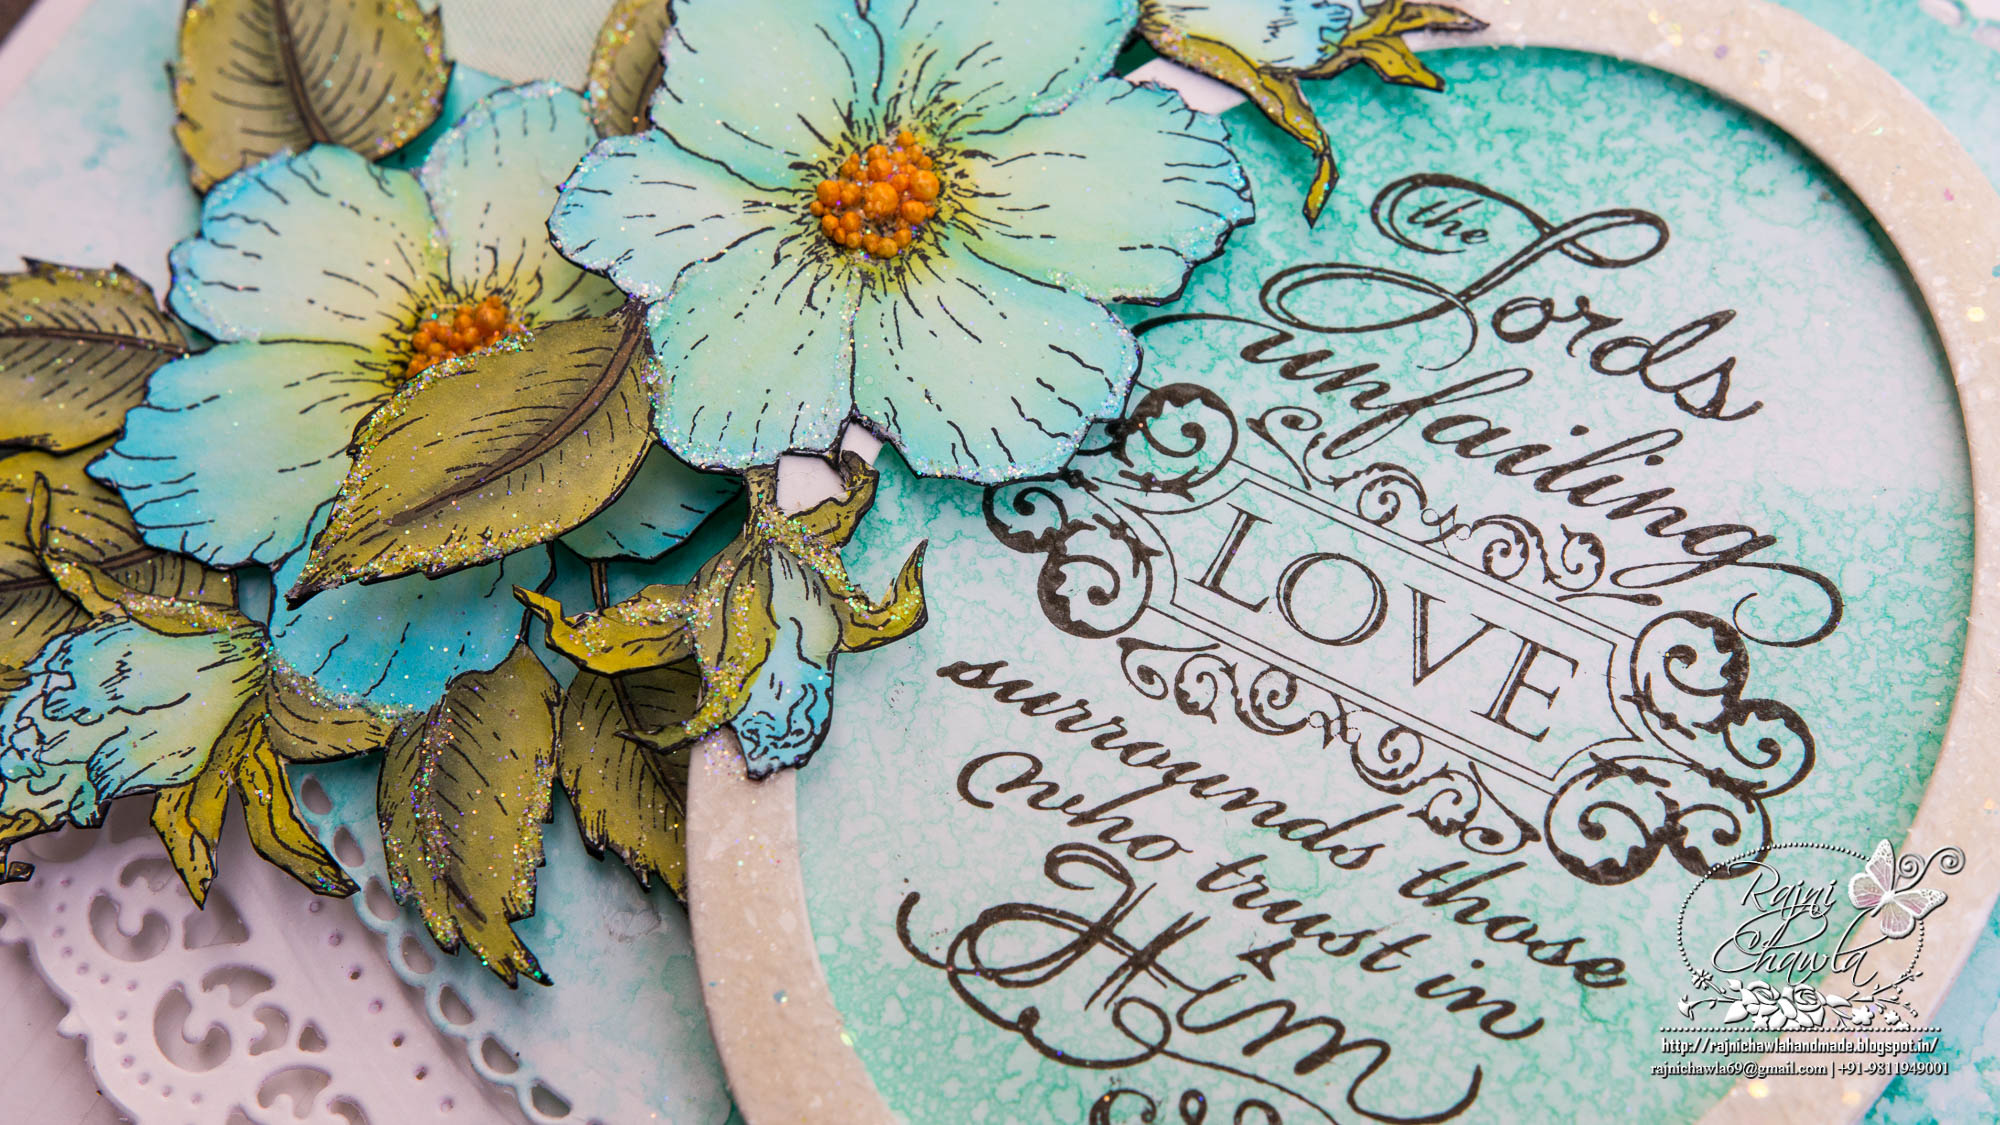
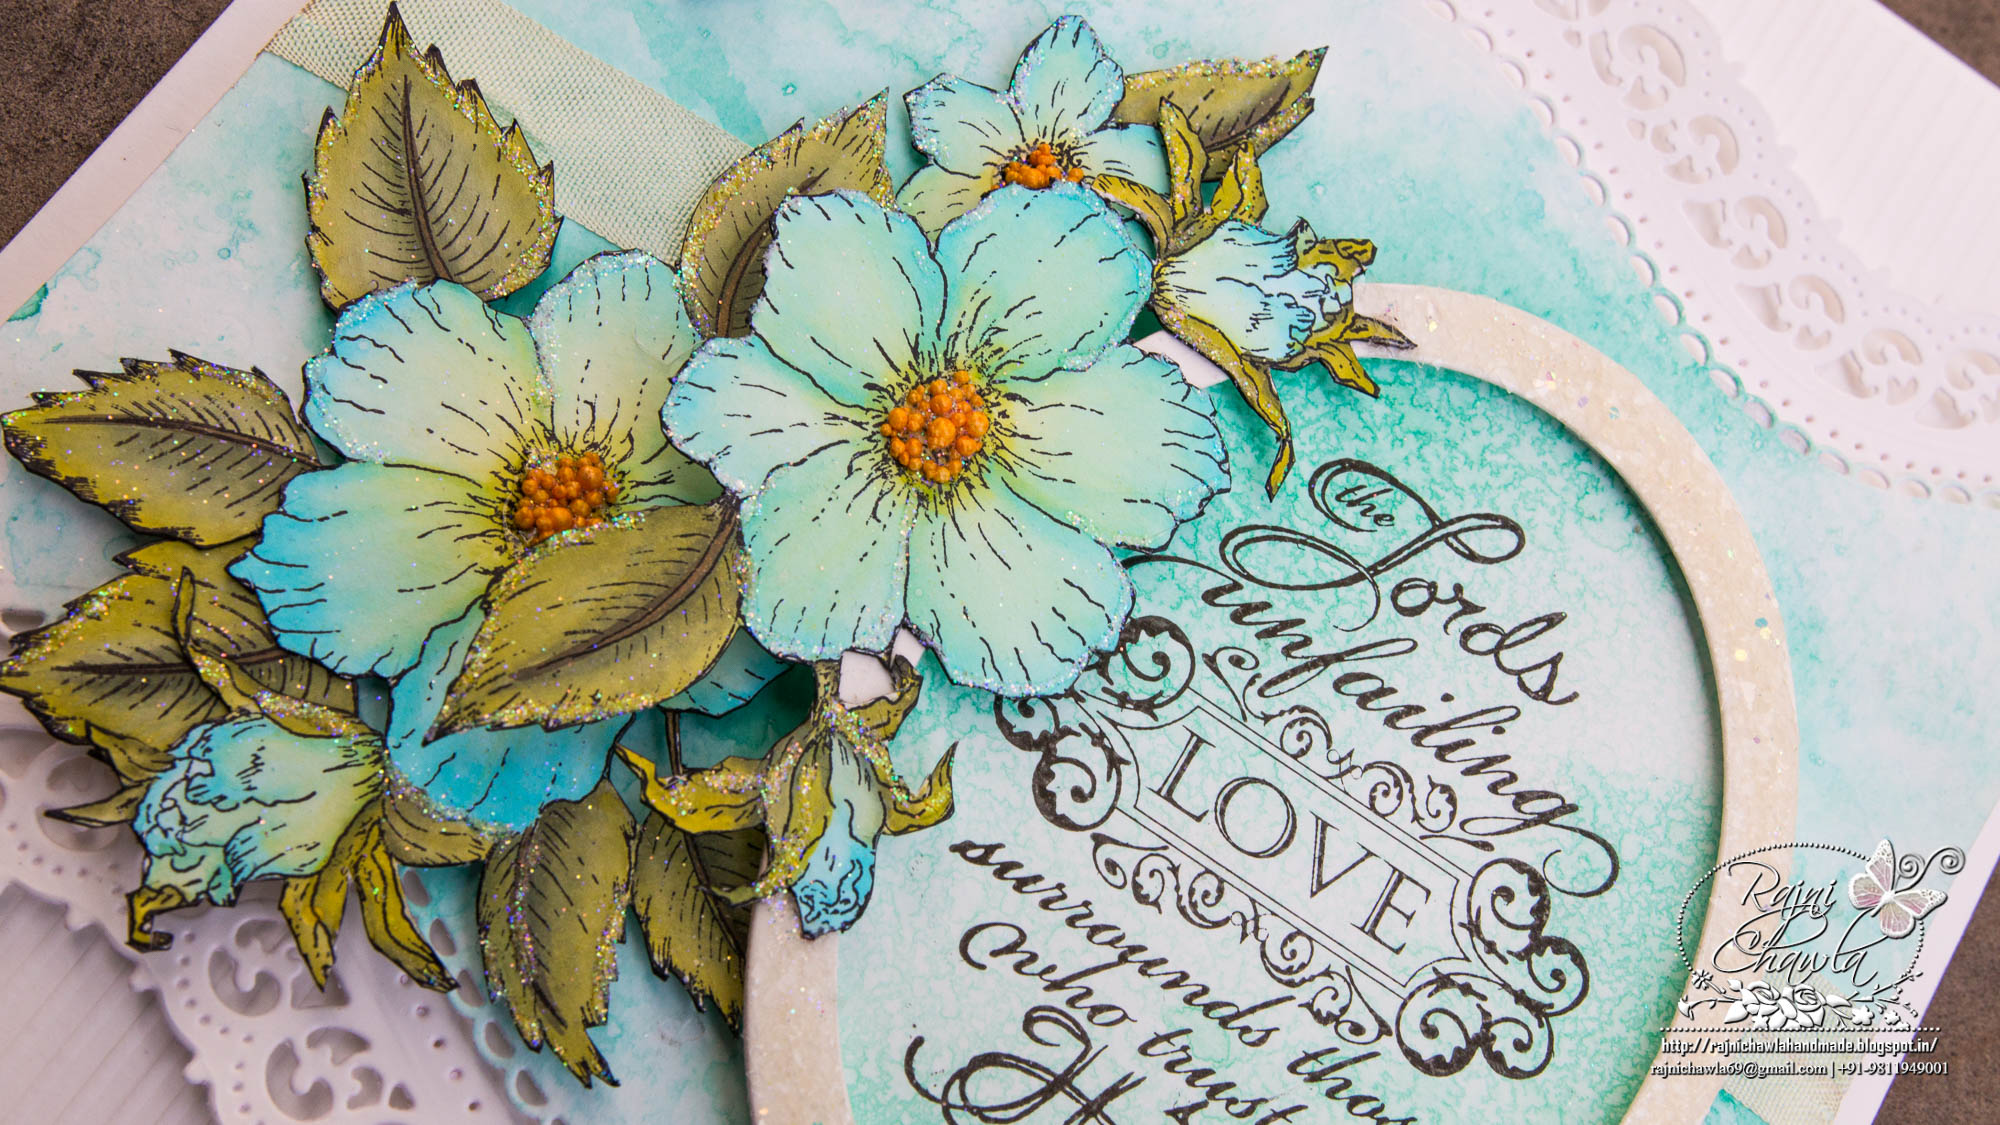
Other Products used: Zig Clean Clear Brush Markers- 032, 036, 040, 041, 044, Distress Inks- Mermaid Lagoon, Peacock Feather, Glossy Accent, Crystal Clear Glitter., Foam Tape, Smooth white card-stock , Scoreboard, Ribbon, Spellbinders Classic Oval Die.
Instructions: The ready top fold card measures 7″ by 8″. The first white layered mat is 6 1/2″ by 7 1/2″ which is scored at 1/8 th of an inch every time. Take another white mat measuring 6 1/2″ by 7 “. Adjust the border die along with its coordinating dotted die from Classic Border Basics: HCDI 7119 on both the top and the bottom end. Run It through your die cutting machine. The top colored mat is 5 1/2 ” by 6 1/2″. Smush Peacock FeatheR and Blue Lagoon Distress inks the craft sheet, spritz with water and rock n roll the sheet in colors and heat set. Once happy with the back ground simply adjust another border on both ends and run through the die-cutting machine. Adhere all the mats together as shown using foam tapes. For embellishing stamp the images twice from Botanical Rose Bouquet Cling Stamp Set with black Archival and paint using Zig Clean Clear Brush Markers. The shades used are 032, 036, 040, 041, 044. Fussy cut the images. Stamp and color one butterfly too. The sentiment is from Courage and Strength stamp and is framed using Classic Oval Die by Spellbinders. Once all the elements are ready, assemble the card as shown.
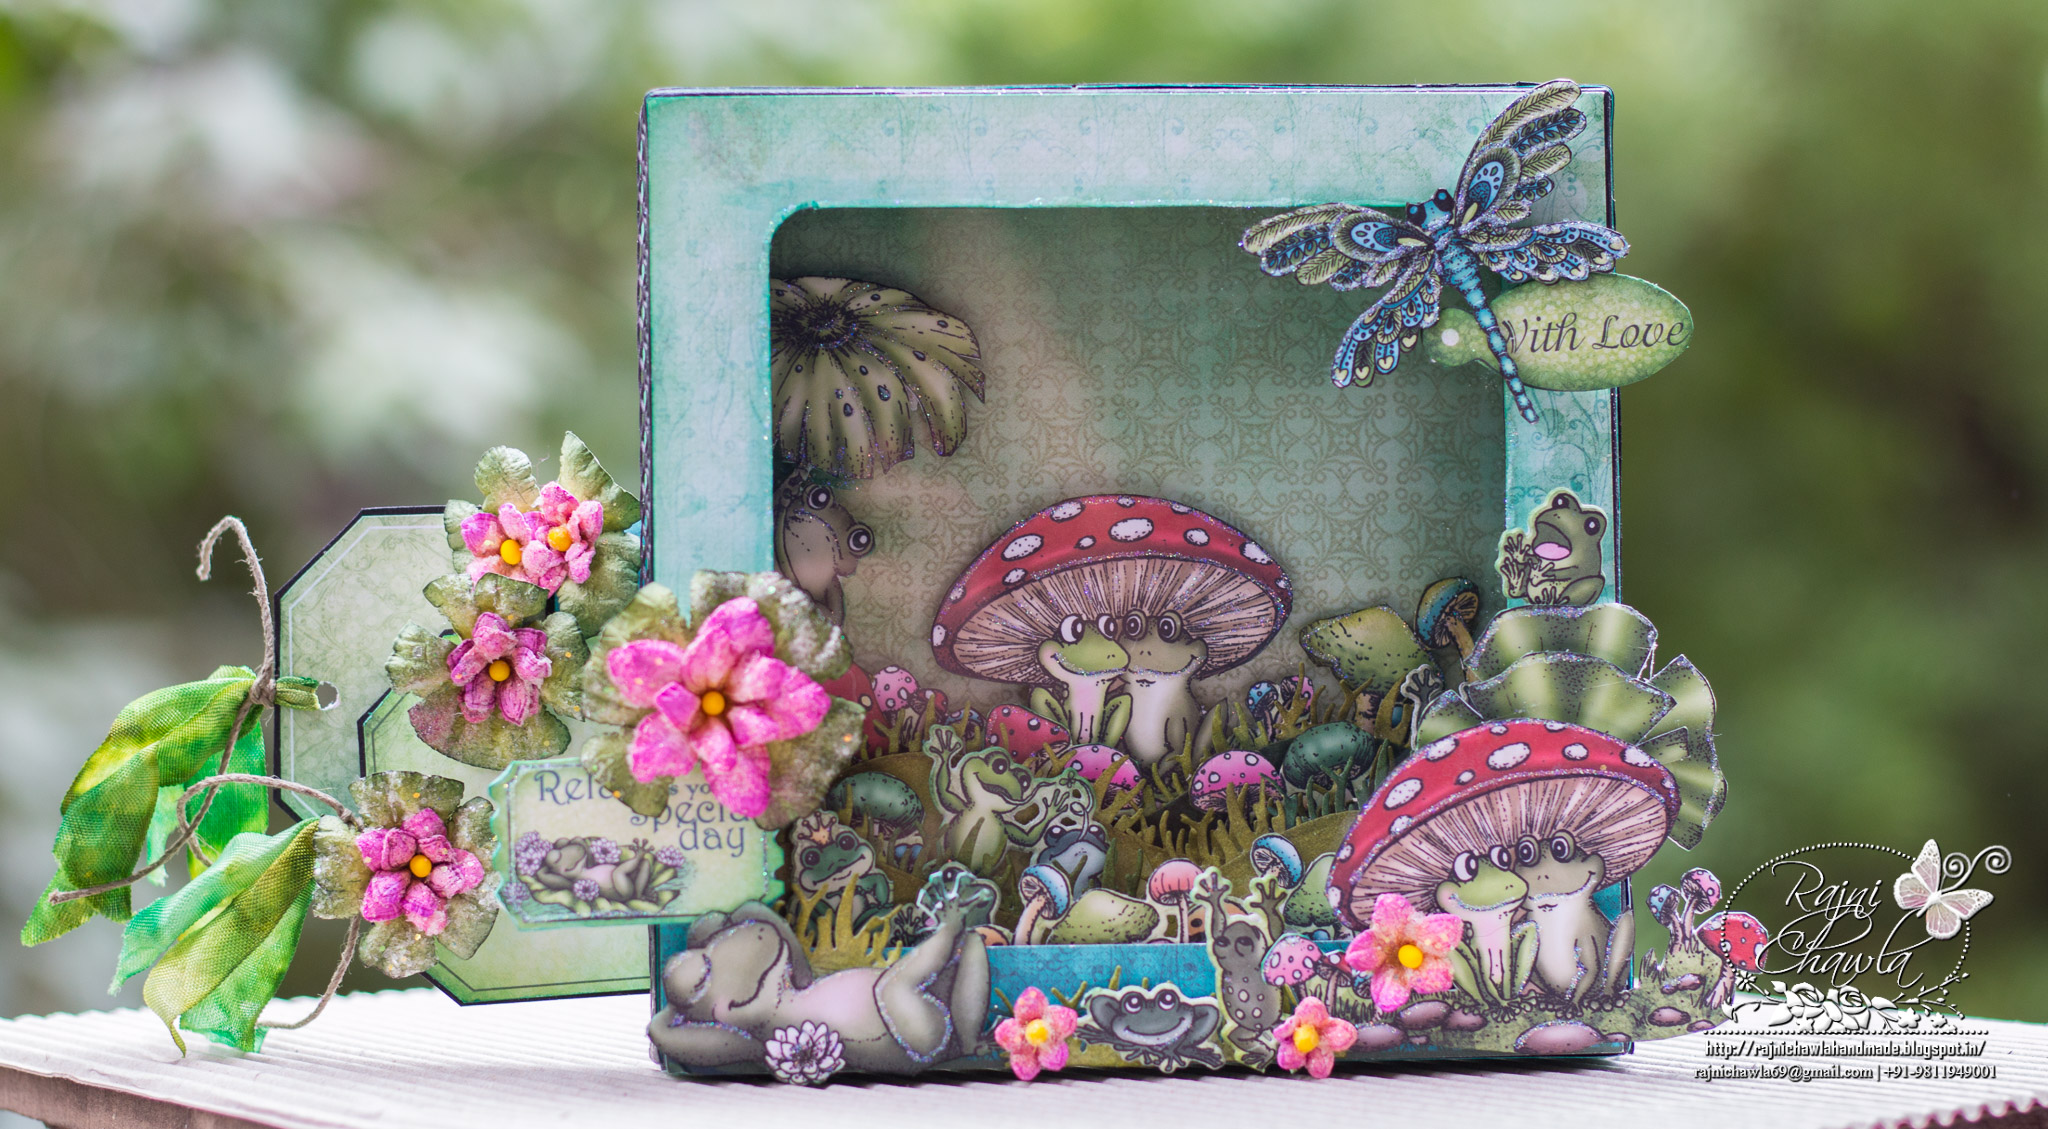
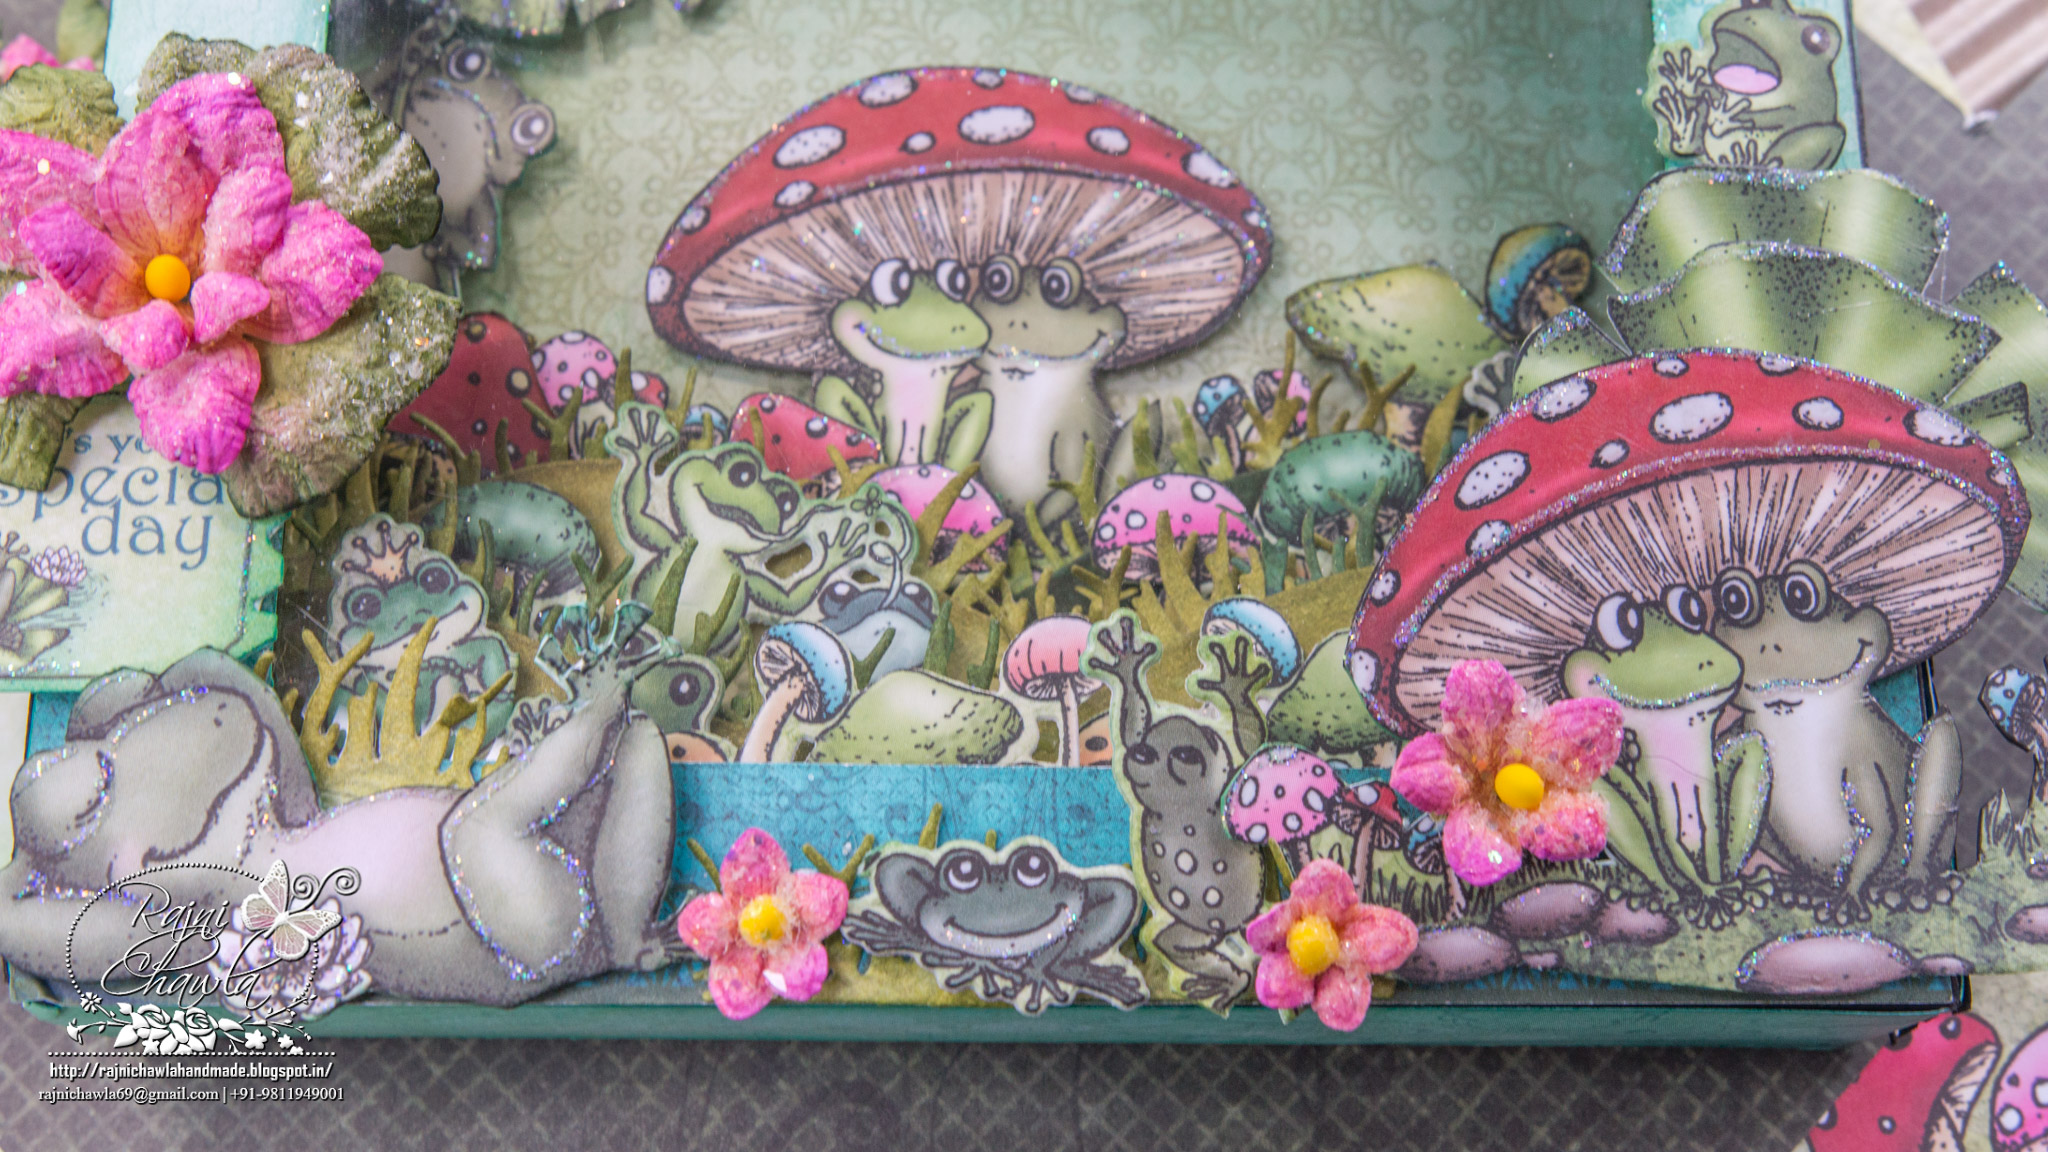
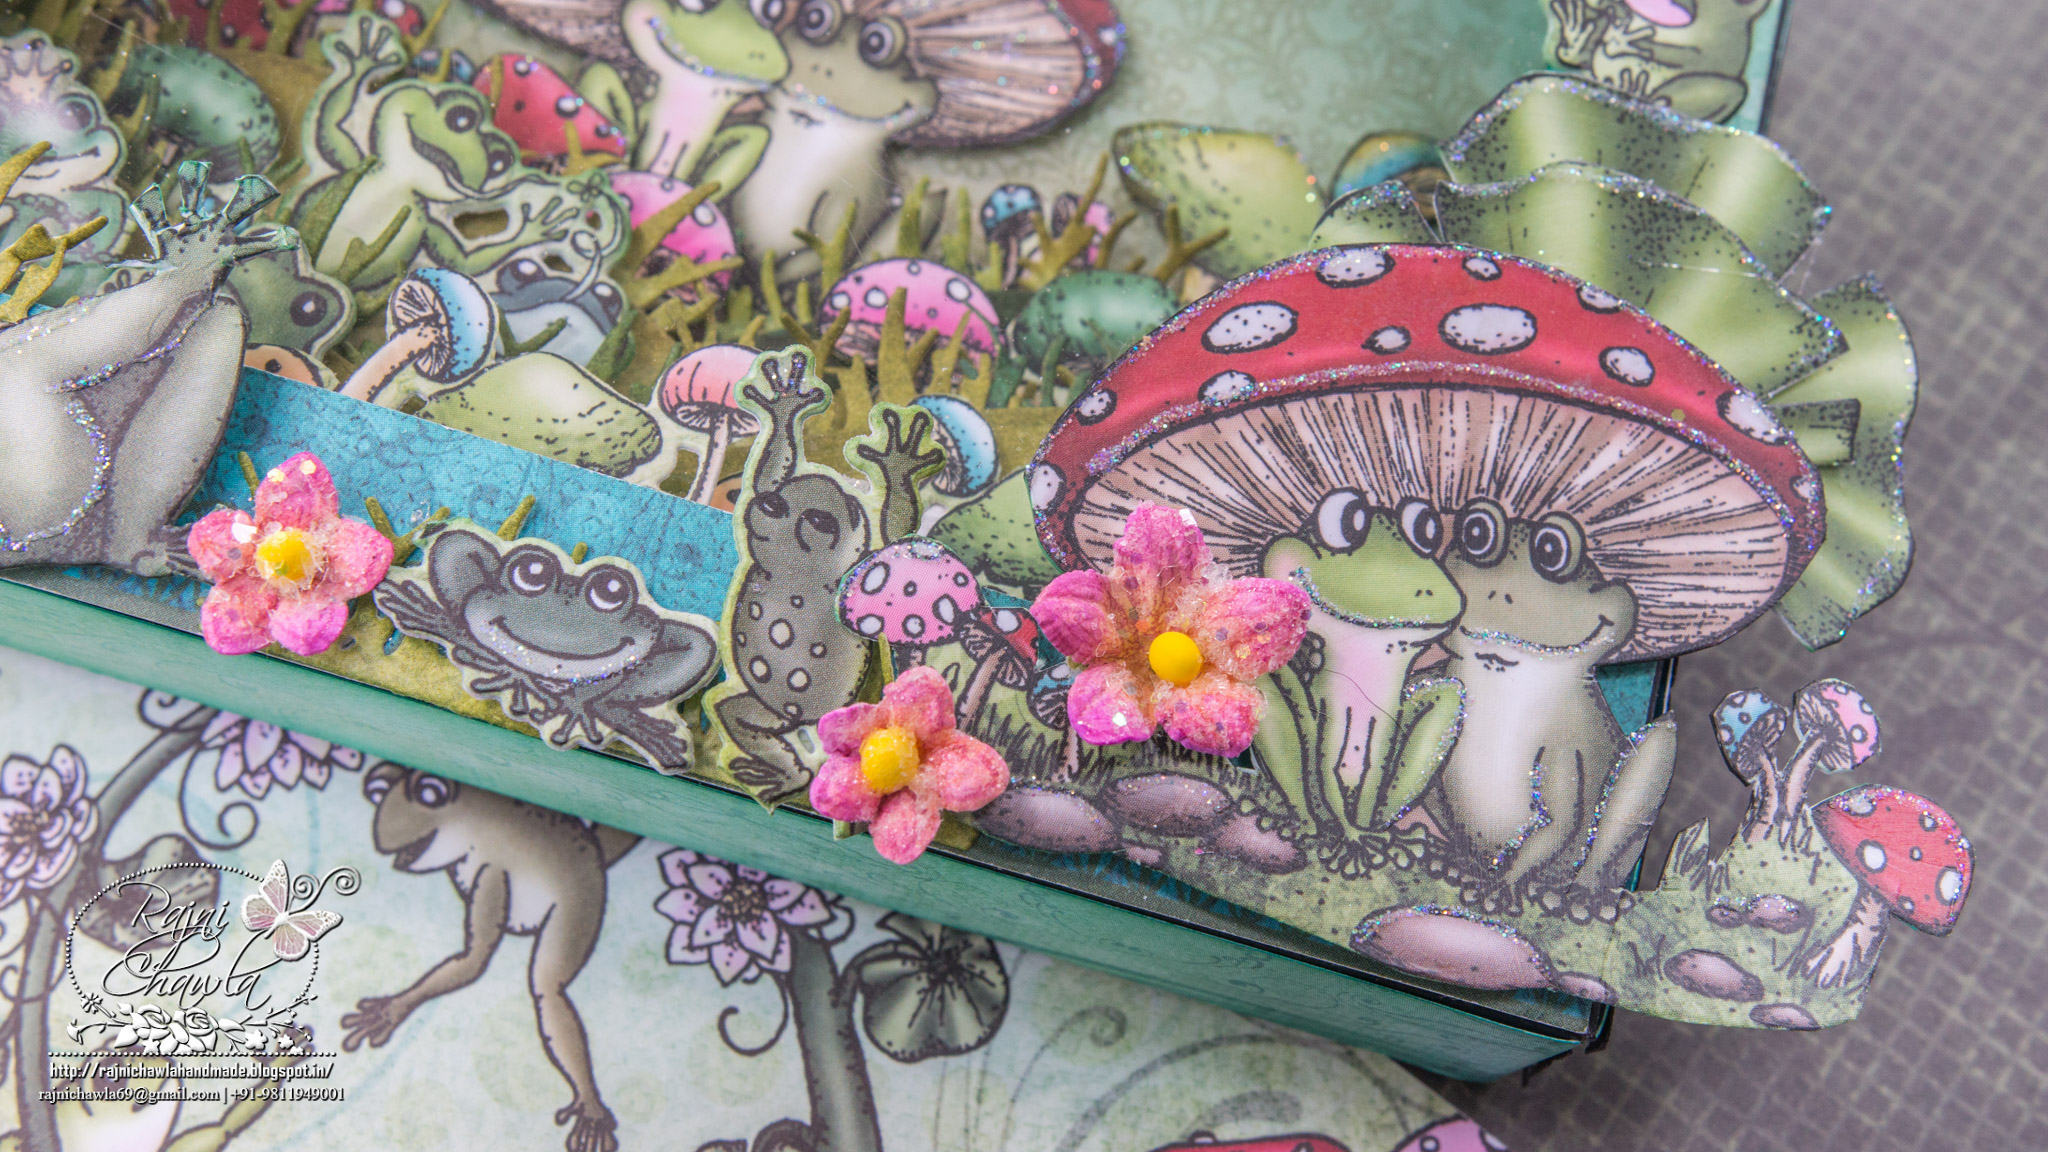
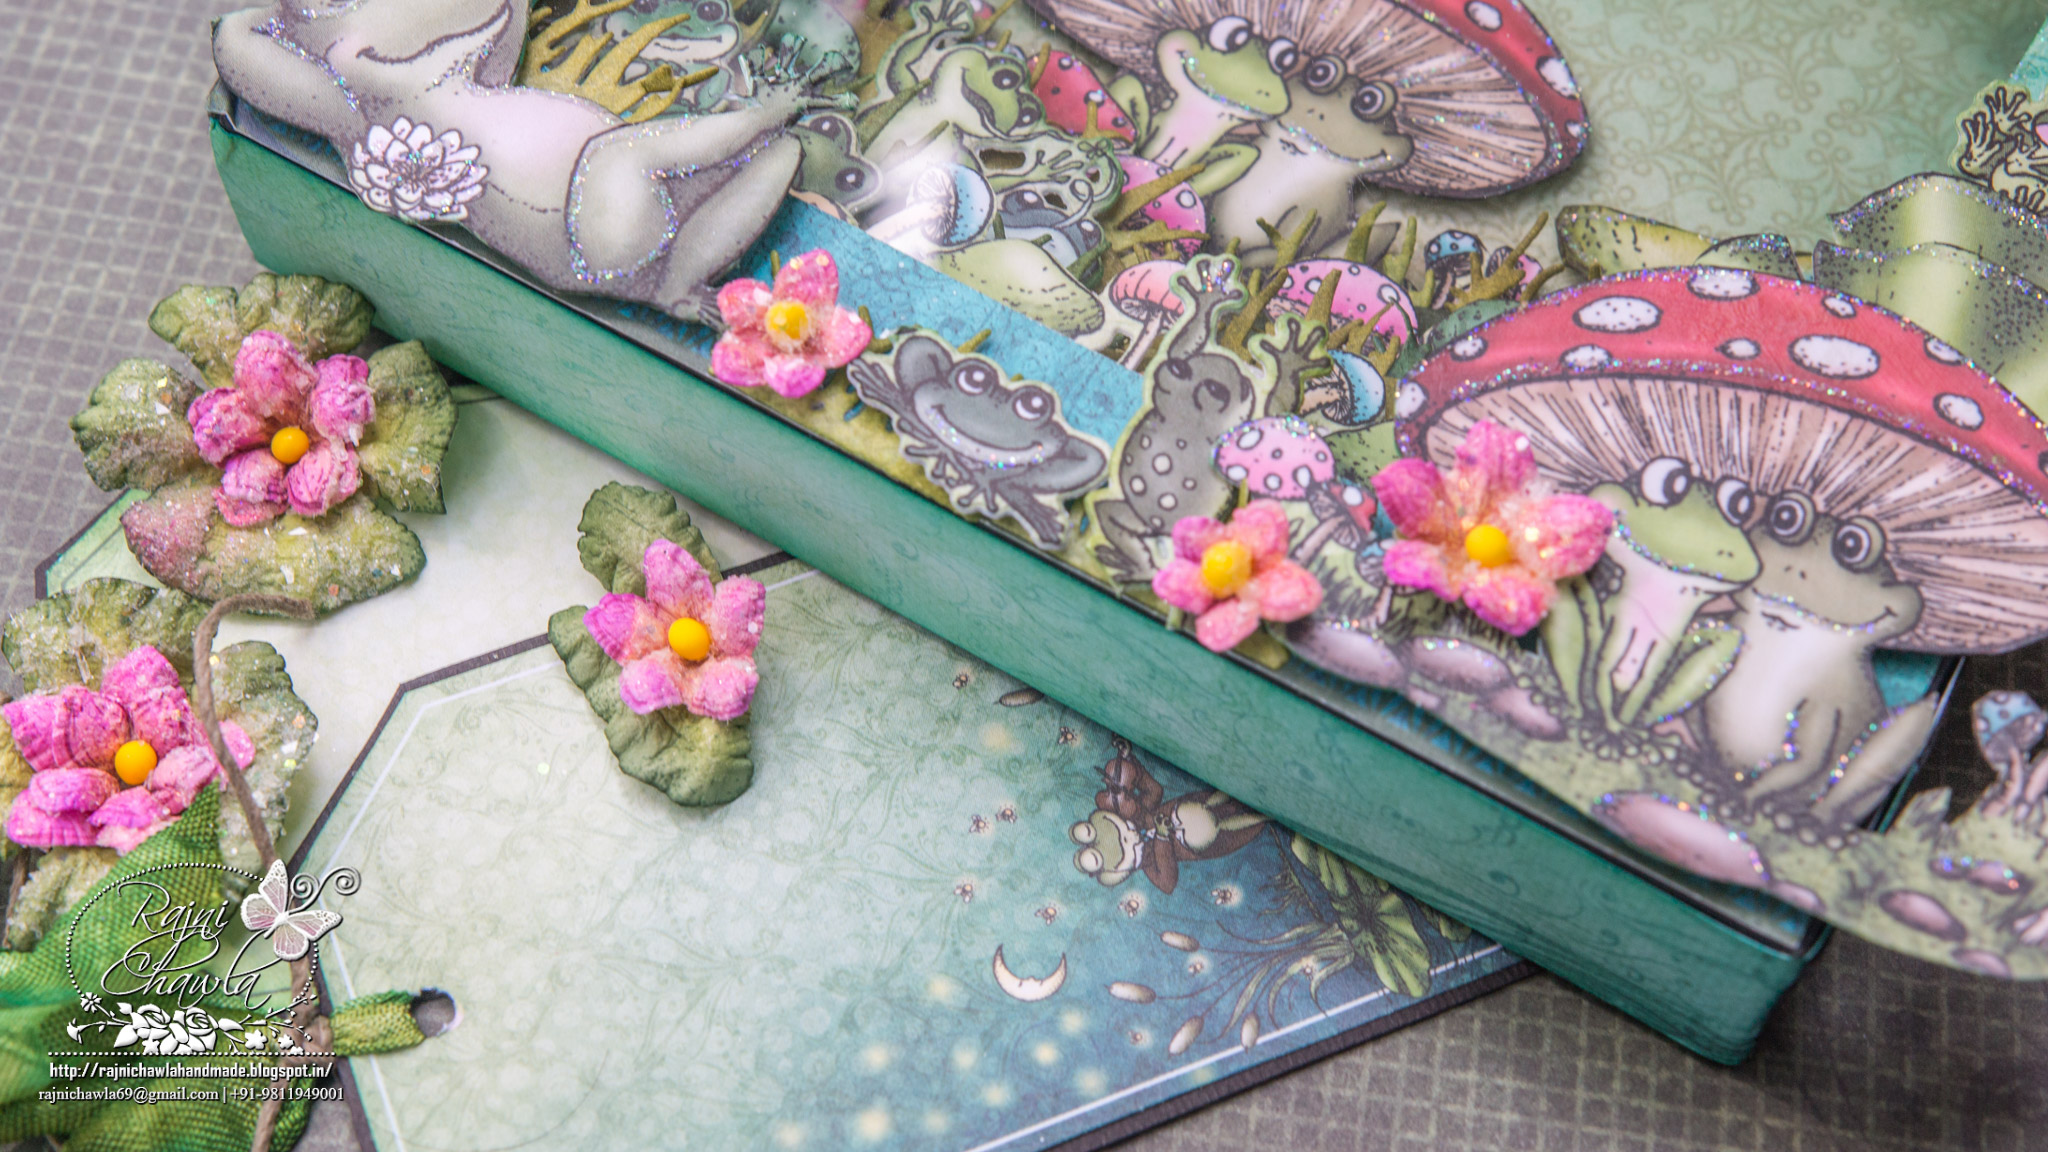
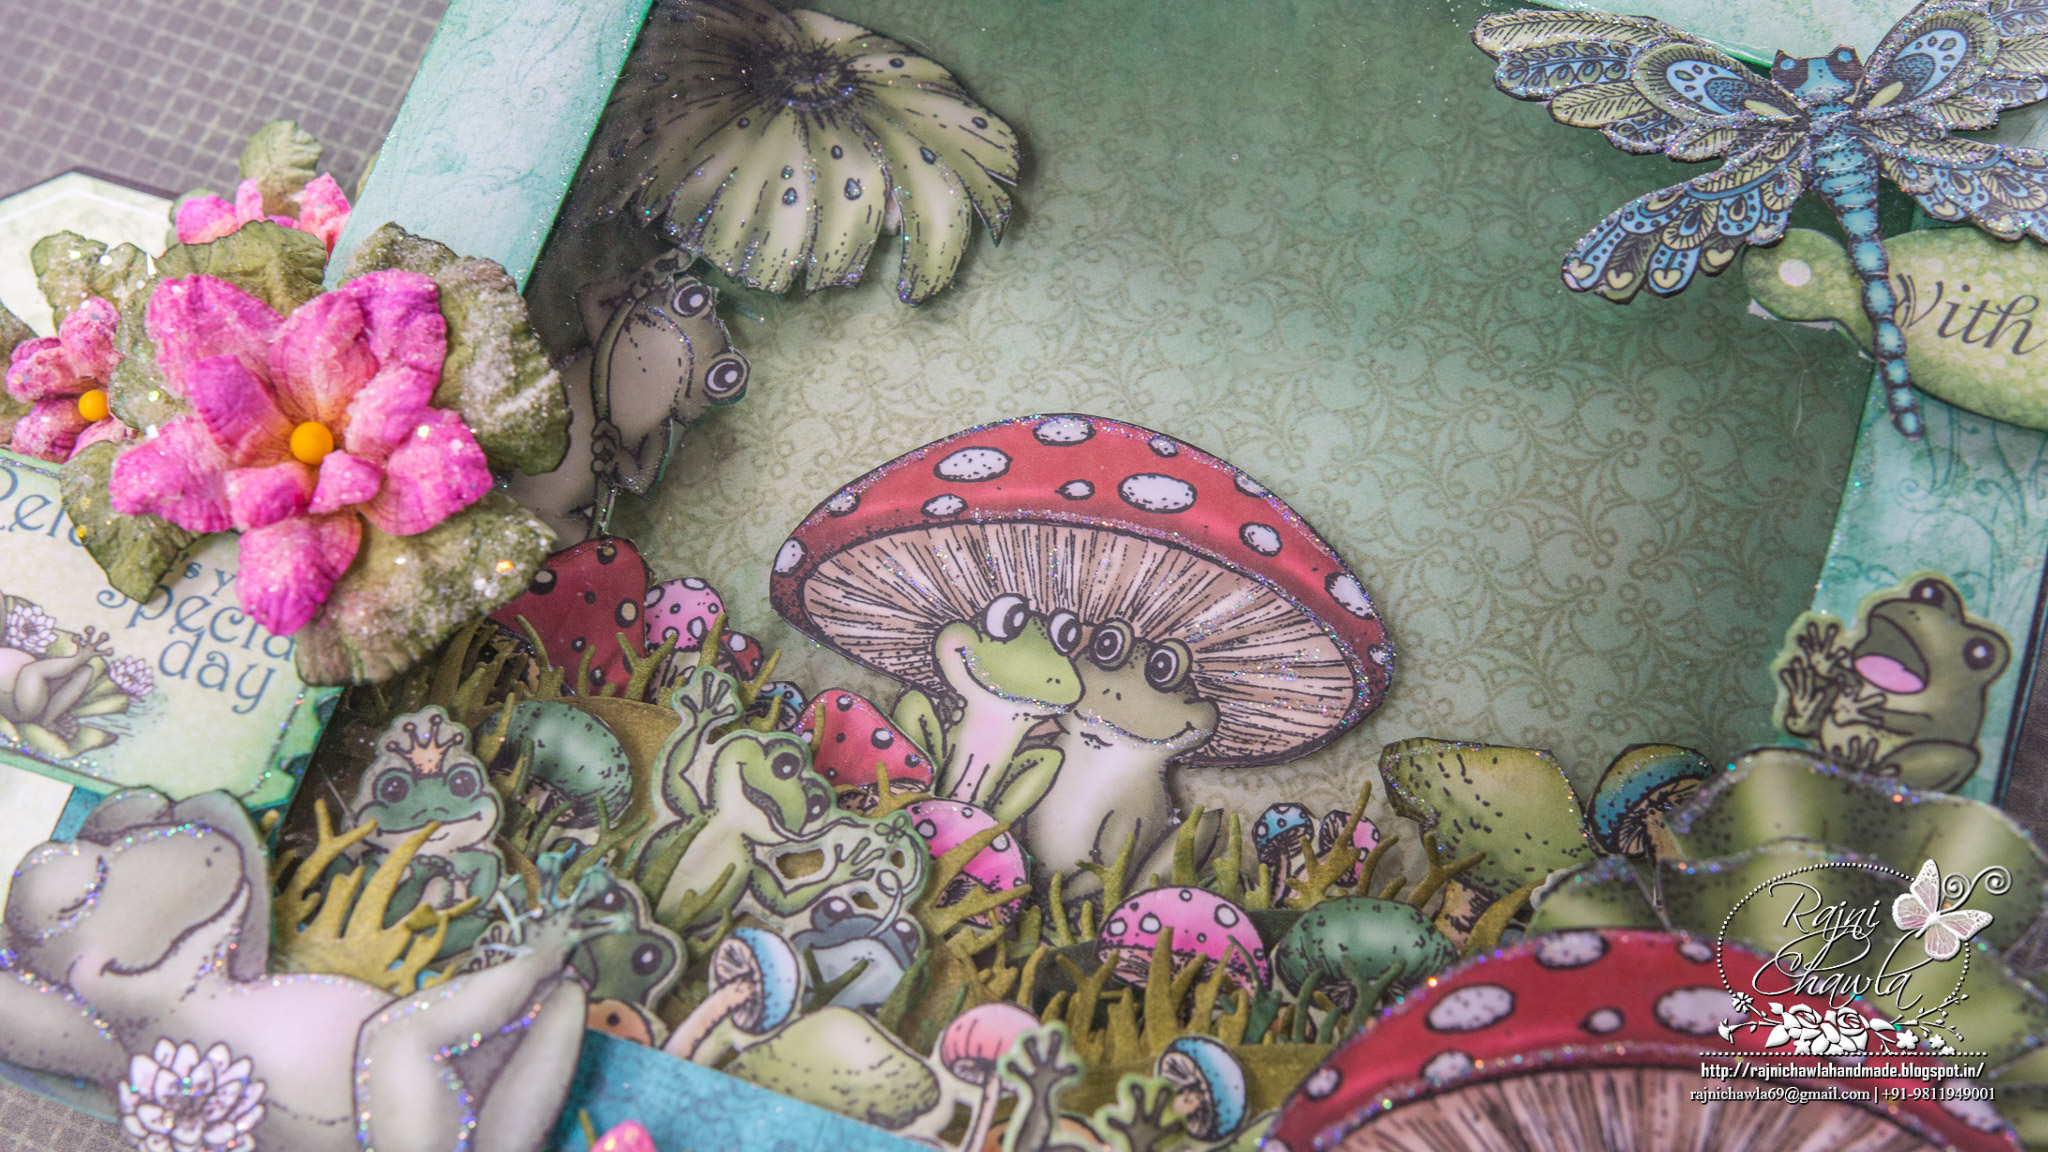
The Second project that I have for sharing is 6′ by 6′ box card using Winking Frog Collection.

Products From Heartfelt creations:
6′ X 6″ Foldout Card Black
Classic Border Basics: HCDI 7119
Winking Frog Paper Collection HCDP1-264
Water Lily Cling Stamp Set HCPC-3725
Water Lily Die HCD1-790
Leaping Frogs Die HCD1-792
Leaping Frogs Cling Stamp Set HCPC-3729
Flirting Frogs Cling Stamp Set HCPC-3727
Gift Box and Mini Snowflakes Die HCD1-7109
Deluxe Flower Shaping Kit HCST1-401
Snow Kissed Flakes and Tag Die HCD1-7108
Designer Dries Clear Adhesive 159723
ColorBox Fluid Chalk Ink Pad – Berrylicious 71053
Other Products Used: Score Board, foam tapes, crystal clear glitter, Sigma Cardstock 230 gsm, Black and green Cardstock, Red Tacky tape, Crystal Clear glitter, Acetate Sheet, Archival Inks – Plum, Library Green, Fern Green and Leaf Green, Finger daubers, Distress Ink Peacock Feather, Ribbon and Twine.
Instructions: Sore and crease all the sides of newly launched 6″ X 6′ Foldout card box (Black). Mat the inside of the box with designer paper from Winking frog Collection. Cover the front as well as the sides with designer paper too. Distressed all the sides softly with Peacock Feather Distress ink. Cut 3 strips of 1 1/2” X 6”, 2 1/2″ X 6″ and 3 1/2″ X, 6″. mat it on a back card stock with glue that dries clear. now cut all the stripes forming peaks and mountains at various intervals using very basic die from Classic Border Basic Die.Adhere them all inside the box. Cut a long strip of 3/4″ in green cardstock and distress one side with peeled paint. Adjust icicle die several times on the green strip and run it through bigshot machine. This will form the look of grass around all the elements. From the designer paper of Winking frog Collection, die cut several images and dress them with glitter using the adhesive that dries clear. Once all the elements are ready,assemble them as shown inside and outside the box giving dimensions with foam tapes. Once you are happy with the arranging all the elements inside the box, cut acetate sheet little bigger to the window and stick from inside of the box using red tacky tape. Close the box card.For the flowers, stamp the images from Water Lily Cling Stamp Set with Archival Plum and paint it using Colorbox Berrylicious. Cut the images with its coordinating die and shape the flowers as taught by Emma Lou. Leaves are stamped with Library Green and colored using Fern Green and Leaf Green Archival Ink. Cut 2 tags from the tag die and adhere designer paper from the same collection. Create two pockets on the back of the box, one vertical and other horizontal so that the tags pop out a little sideways. Decorate the tags with flowers and further embellish them using twine and ribbon.
If you just got here from Marisa Job’s blog, you’re on the right track. If not you can start at Candy Slabaugh’s blog. After my blog, it’s Martine Smith’s turn. Here is the list of all the participants…
Candy Slabaugh
Anita Kejriwal
Amarilys Doria
Debbie Seyer
Joann Jamieson
Glenda Brooks
Maureen K Russell
Susan Smit
Karan Gerber
Marie Gamber
Olga Jewell
Angelica Turner
Tracy McLennon
Marisa Job
Rajni Chawla (You are here)
Martine Smith
Tracey Fehr
Alicia Barry
Kathy Roney
Sandy Hulsart
Liz Walker
Lori Williams
You make very great cards. would love to win an make cards as lovely as yours.
Always love looking at your work Rajni.
Rajni, that first card, love the watercolored background and then the flowers match so beautifully, the frog shadow box is lovely, really love your attention to detail and layers.
Hi….you did it again….show stopper cards! Love them both! Love all the details. The fold out cards and box…and the new borders…I love what you did with them.
Wow both projects are fantastic. Specially dat butterfly.
Thank uh rajni man for instructions.
Wow both projects are amazing specially butterfly.
Thank uh rajni mam for instructions.
Love love love them both cards
Thanks for sharing
Rajni mam you are just awesome I am in love with you n your work. I choose heartfelt products only after seeing the magic you create with them. Keep inspiring
Such tiny pieces qnd beautiful work all around
Just awesome!! I felt in love with heartfelt creations all because of Rajini ma’am. Thank you 4 that. With the way you create variations using the same stamps & die is just mind blowing make us think how to create your own versions by giving special touch. Learning from you was a great experience. Thank u so much
OMG these cards are so beautiful. I love stamps and background die. Cannot resist buying heartfelt.
Such mesmerising work.. its always pleasure to see your work…
Thanks for the ideas which you gave by your cards. 🌺
Wow just completely in love with heartfelt creations collection love all the profucts and your creativity with them Rajni aunty. I just can’t resist myself from heartfelt creations. Waiting eagerly for the Black Friday and hope to win. Love all your work Rajni aunty keep inspiring. Loveeeeeee uuuuuuu.
Wow Wow Wow !!! What more can I say .Both cards absolutely fabulous Rajni as always .Especially love the winking frog card So much detail . Heartfelt creations have certainly won my heart !!
Wow that’s an amazing blog hop! And as usual, your cards are stunning mam! Love the sparkle on the first one, and all those tiny cute details on the box card 🙂
Both of your projects are fabulous! I love the softness of the first one but the pop of bright pink makes the second one stand out. As always, you have made beautiful use of Heartfelt Creations products!
Sandra Smith
Absolutely beautiful cards! Love the colour scheme of the first card and your box card is too gorgeous xx
I love your color choices! So very, very pretty!
Your each n every work is as awesome as you are….n it will be a pleasure to receive a giveaway from you😊
Your work is absolutely breathtaking. Your work is the best I’ve seen. Anyone would be over the moon to win this collection. It is a MUST HAVE for us all.
So much attention to detail on both your projects. As always, I love them both!
Wow amazing card and shadow box.heartfelt creations create a great effect on everyone’s heart
Wow! Love your layout and the colors of your cards.
emily65
Wow ..wow…its awesome….
Always looking your work mam….love all your’s project..
Love with heartfelt creations products….bcoz of u mam
And thanks for sharing your art….
Yes, yes, yes, your projects are outstanding. Just beautiful. The colors are cheerful
Wow ..wow…its awesome….
Always looking your work mam….love all your’s project..
Love with heartfelt creations products….bcoz of u mam
And thanks for sharing your art….
Lovely!!! Just amazing and beautiful!
Just Beautiful!
Wow, what a beautiful delicate card. I love the border dies. The frog card is so cute, just makes me smile.
Your work is so beautiful and detailed.
Totally stunning!! I am always blown away by the sheer beauty of your cards!
Rajni, these are amazing cards! The second one reminds me of the pages from Beatrix Potter books, which I LOVE!
A fantastic job on both cards!
Both projects are gorgeous!
The card is so stunning aunty. Loved the water-coloured background and yes the flowers are mesmerizing as always. 🙂
Your cards are so Gorgeous! I love the dies and the stamps you’ve used.
LOVE THE COLORS YOU CHOSE!
ANN ROBBINS
Such great products and projects.Thank you so much for sharing 💙The blue floral and butterfly.
The shading is exquisite! Beautiful cards that make me inspired to take mine up a notch. Thanks!!
Such a lovely card
You have created awesome and Beautiful cards and thank you for sharing your gift.
Love it! Thanks for sharing. Very creative.
Much love your amazing works…
Gorgeous cards. Love the border die’s.Thanks for the chance to win. Have a Blessed Thanksgiving.
Fabulous! Your work is incredible!
Both of your projects are extremely beautiful, fantastic. It’s easier to go through your instructions and get inspired. Thanks a lot for these uploads.
Love your cards especially the first one with the turquoise flowers!
both of your projects are stunning!!!!!!!!!!!!!!!!!!!!!!!!!
The Winking Frog is one of my favourite collections and I absolutely love the frame.
I love your work you always inspire me!!😊
Love the winking frogs. So pretty.
Gorgeous! You do amazing work!
Thank you for sharing your beautiful card!
I love these …. the blog hop is a great marketing technique. The cards are all beautiful
Both cards are so beautiful. I LOVE the colour on the first one. That lagoon colour absolutely makes it pop out. Thanks for the inspiration.
Oh my goodness. I love the flowers
No fair! The card was beautiful enough and reminded me of my great grandmother but then you had to make the wonderful card shadow box!!!! The box is awesome! There is so much to look at! It really engaged my imagination! I love it!
No fair! The card was beautiful enough and reminded me of my great grandmother but then I saw the beautiful shadow box card!!! I love it! There is so much to look at. It really got my imagination working overtime to make a story about the scene. It is wonderful.
Stunning creations. You do great work
Both cards are very beautiful but I love the first one the best! It’s so clean and crisp. It will be a work of art that the recipient puts on a mantle or in a frame! You do really good work.
Gosh, those are two great cards–so different. I love the froggy card because it’s cute and sweet. The other is elegant. Nice job.
Your cards and your flowers especially are amazing! I would love a chance to win.
As usual,LOVELY creations by you Rajani Mam. You always keep me inspiring.
Nice use of color. I always love to visit your site. Your work is so inspirational.
I thought your first card was amazing but then you added the frogs. Wow now I just have to stop looking and go make some new froggy cards. Thank you
So talented and great inspiration
What a lovely, calming card…just beautiful!
Lovely! Simply lovely…
love all the colors it makes your card come alive, beautiful
Rajni,
Your cards are beautiful! I love the colors you have chosen. The frogs are so cute. Your cards are well done. Love, love, love them.
So pretty! Love it.
Marie
Lots of work on both cards, but I really like the first card and the colors!
Awesome! Love this card.
Loved both of them specially the first one..
both cards are so beautiful!!! The one with the frogs are too cute!!
Love both designs, but the card is what caught my eye. Lovely! As always, a wonderful design. Heartfelt does it again with these wonderful designs and great tools!!!!
Beautiful!! Thank you!!
Rajni, both of your projects are so praiseworthy. The fun and whimsical froggy themed window box is so happy and lively. Well done. The card is so soothing and pretty. You are very blessed with talent. Thank you for sharing with us.
Love the colors and design of your first card. Just beautiful!
Oh my you have my vote on the frog card. The detail in it are incredible. What a lot of work went into this card. The other card is beautiful too with all the detail and shading.
Your projects are lovely! The winking frog collection is so cute! This giveaway is so exciting!
Like the butterfly, frog, colors used and borders. Super cards!!
Love the light aqua card and the box card with froggies is so cool!!
Your work is awesome. The colors are my favorite. You got me in my craft room today!
Both your cards are so beautiful! I love the shading in the blue flowers of your first submission and the way that the colors pop with the details you incorporated in the card. The second submission has the 3D waterlilies, with yellow centers that really set off the flowers. How did you do those? They look like a mini pom-pom!
Beautiful cards and such an inspiration.
I love these projects, the Zigs are so well suited to this style and give just the perfect tones to your projects. The first card is stunning in it’s contrast love it.
Oh i love the Lord’s unfailing love stamp on the fist card!!! What a beautiful colors!!!
Always love your work…Keep rocking!!!
These cards are full of detail and beauty. Thank you for sharing. The recipient could spend days looking at them and seeing something new.
What gorgeous cards! Love the colours you used and the glitter! I love glitter 🙂
Almost bought that frog collection at CKC Woodlands Texas, but snow kissed won the battle…would love to win froggies to add to my collection!! Beautiful box card…
Oh wow!! These are amazing!! Thank you for sharing
I soooo want to get this frog collection, it’s on my list!!! Love that box card…
Very beautiful!!!
I’ve got to do the dual colors on the flowers. I love that look and I’m not doing it.
Love the colors and so much detail in the second card – a work of art
The first one is so deliciously beautiful and the second is a smilin’ delight!! Love all the glittery details!!
your cards and dies are awesome!!! this is an awesome blog hop. so much to see and decide upon!!!
Wow. Both of your creations are amazing. The first card is so elegant and fresh and your card box is just spectacular. So detailed and colourful and full of things to look at. I love them both. Thank you for sharing. I can’t wait to try the new products.
Both of your projects are just gorgeous… the effort you have put into these is worth it .. Stunning creations x
WOW, both projects look amazing. I love both but those frogs really great! Love the shaped cards and box coming…LOL
Gorgeous projects.
The blues in your first card are so timeless and elegant. This card would be great for a man or woman in time of need. I like that and how you used the score lines on the background. So creative. The winking froggies in the box are SWEET and I hope to one day do something like this for my aunt who used to have a froggie bathroom. I love how you thought outside the box and used a box to utilize all the frogs in that collection! Thank you so much for your inspiration. It is awe inspiring!
beautiful cards – super cute frog project!
Love both of your cards!!
Wow, so pretty, love the colors, the layout. They are beautiful. what a generous gift.
Beautiful card and flowers. Then the frogs. They are just too cute.
Beautiful cards, especially LOVE the Winking Frog one — so detailed!!
What gotgeous projects! I loved the card, then saw the shadow box!!! Wow!
Love your card!
Love these ! Crazy about the frogs!
Gorgeous card, I love this one.
love this card so much
Your cards make me happy 😀. I’ve been following you for the past 3-4 years and everytime u create something new, it makes me say WOW. The way you play with the colours, is absolutely fantastic. And, the end result is totally gorgeous 😍
Beautiful cards
I am so impressed by your projects. The card is so beautiful. Love the blue against the white. The texture you created and I especially like how you framed the sentiment. The diorama you created is darling. I feel like I could step into a fairy tale land. Well done.
Your work is amazing!!! Both projects are so beautiful but absolutely LOVE the Leaping Frogs shadow box and layers of gorgeousness!!! Wow!!
Both projects are great but the first card is spectacular. Love the colors you’ve used…..beautiful! Thank you for sharing.
This is just so beautiful, so much detail ……. I’m lost for words! x
Love these the dragon flies are my favourite
Your paintings on flowers is super amaizing. Awaiting for a win in black friday release
The frogs are so adorable. Love the Heartfelt Creations dies and stamps.
Both projects are amazing in their own ways. The Winking Frogs have so many details, so pretty and your card is just stunning in all it’s detail and yet not over done. Just beautiful!
love, love, love your work.
Awesome creations with awesome products. What a joy it would be to win this prize.
Waoooo…. superb work aunty as always, really beautiful, love new border design of heartfelt creation… ur work always inspire me to do papercraft..
Lovely color combination. How to participate in this giveaway. Did we hv to reply on every post or what
Thanks..the more you comment, the more chances you have for winning.
Beautiful color choices, shading and design – really makes these pieces stand-outs!
Love ❤️ the delicate colors of watercolor. Beautiful cards!!! Thx!!
Wow! These are gorgeous projects! I love all the intricate details in them. The scenery created in the second one is awesome!!
Thanks for sharing.
Cheers
Preety
Butterflies…..Roses…..Glitter…. And Turquoise
All my favourites!
The best of the best
Gorgeous card
Beautiful choices
Beautiful card
Super projects! The first is so elegant and the second is fun and whimsical!
Terrific use of the HC items. Your projects are terrific and the first card is my favorite!!
OMG love the first card.
The colors are beautiful.
The 2nd card with mushrooms is cute
Stunning and beautiful
the first card is more plain and simple and so pretty.
Less is often more.
Love the shadowbox of the frogs. fun project.
thanks for sharing.
Card 1… Amazingly Beautiful… so beautiful in fact that I was touched deep within by it’s beauty… Until…
Card 2 (shadowbox)… I laughed… This is just so stinking cute… I love those frogs… Not sure why but they just get me every time… I love the extensive collection of them that you used to create a work if art.
Thank YOU for sharing your creativity with us!
I love the color and shading on your first card. Beautiful.
Both the cards are beautiful but the box card took my breath away…. hope to be able to make cards like that some day.
Amazing attention to detail! Two very beautiful creations!
Wow…I just love your work and these two gorgeous projects do not disappoint. Thank you for sharing your amazing talent and thank you to Heartfelt Creations for creating such amazing products!!!
your cards are beautiful
Beautiful cards…stunning colors…I would love to have the items to make something similar! Thx for sharing!
Fun frog card and love everything about your floral card.
Oh how pretty. Those dies really make these cards ,,,,
Oh wow! That first card is absolutely breathtaking!
So pretty, hard to pick a favorite. The frog is so very cute. I am loving do this blog hop and seeing all the talent
Gorgeous projects. Love the colors you chose. TFS
Hands down the most unique cards so far on the hop. I absolutely love these cards.
Hi, both projects are fantastic.
Both your cards are gorgeous.
Stunning use of the Heartfelt Creations!
So Beautiful! Love the frogs.
Very pretty. Love the colors 🙂 🙂
Such creativity and beautiful cards. Thanks for sharing with us.
Simply Gorgeous 🙂
These are so pretty. It would take me forever to do these!
So pretty. Your coloring is so good. Pretty.
Stunning… love the flat flowers… who’d a thunk? Just gorgeous. I have the some of the frogs.. what a great inspiration to get busy!! Thanks for sharing such beautiful projects!
Gorgeous layers to your
card. The flowers are
so,pretty.
Carla from Utah
Absolutely breathtaking card! I love the colors and the dies you used! Amazing detail! Your box is also fabulous… love those frogs!
I like all the white on the first card. Pretty colors
This is beautiful. The boarders set this apart and the sentiment is lovely and well said. I would so love to win this and it would be an complete blessing.
Just love both of cards, they are so pretty!!
I love the colours you’ve used so pretty.
I love the frog card!
Fabulous work on
both creations!
Loving the flowers
and the frogs and
butterfly.
Carla from Utah
Wow we have been blessed with two gorgeous designs. The first is absolutely stunning! So elegant & so soft in colouring. Loving the butterflies & the border you have used. The box card is adorable. The frogs make me giggle as they are so cute 🙂 Thank you so much for the inspiration & for sharing it with us. Have pinned for future reference.
Beautiful 🙂 🙂
Too adorable! I love those cute froggies, and all the wonderful little details!
That frog shadow box is fab
Love it, the colors are perfect for this!