


Good Morning All….
Today’s the day the Leafy Accents Stamp, Die and Mold become available to everyone! Quick and easy to use, these leafy accents stamp, die, and shaping mold are wonderful tools to create dimensional leaves when the time is running short, tired hands need a break or a design calls for a significant number of leaves!
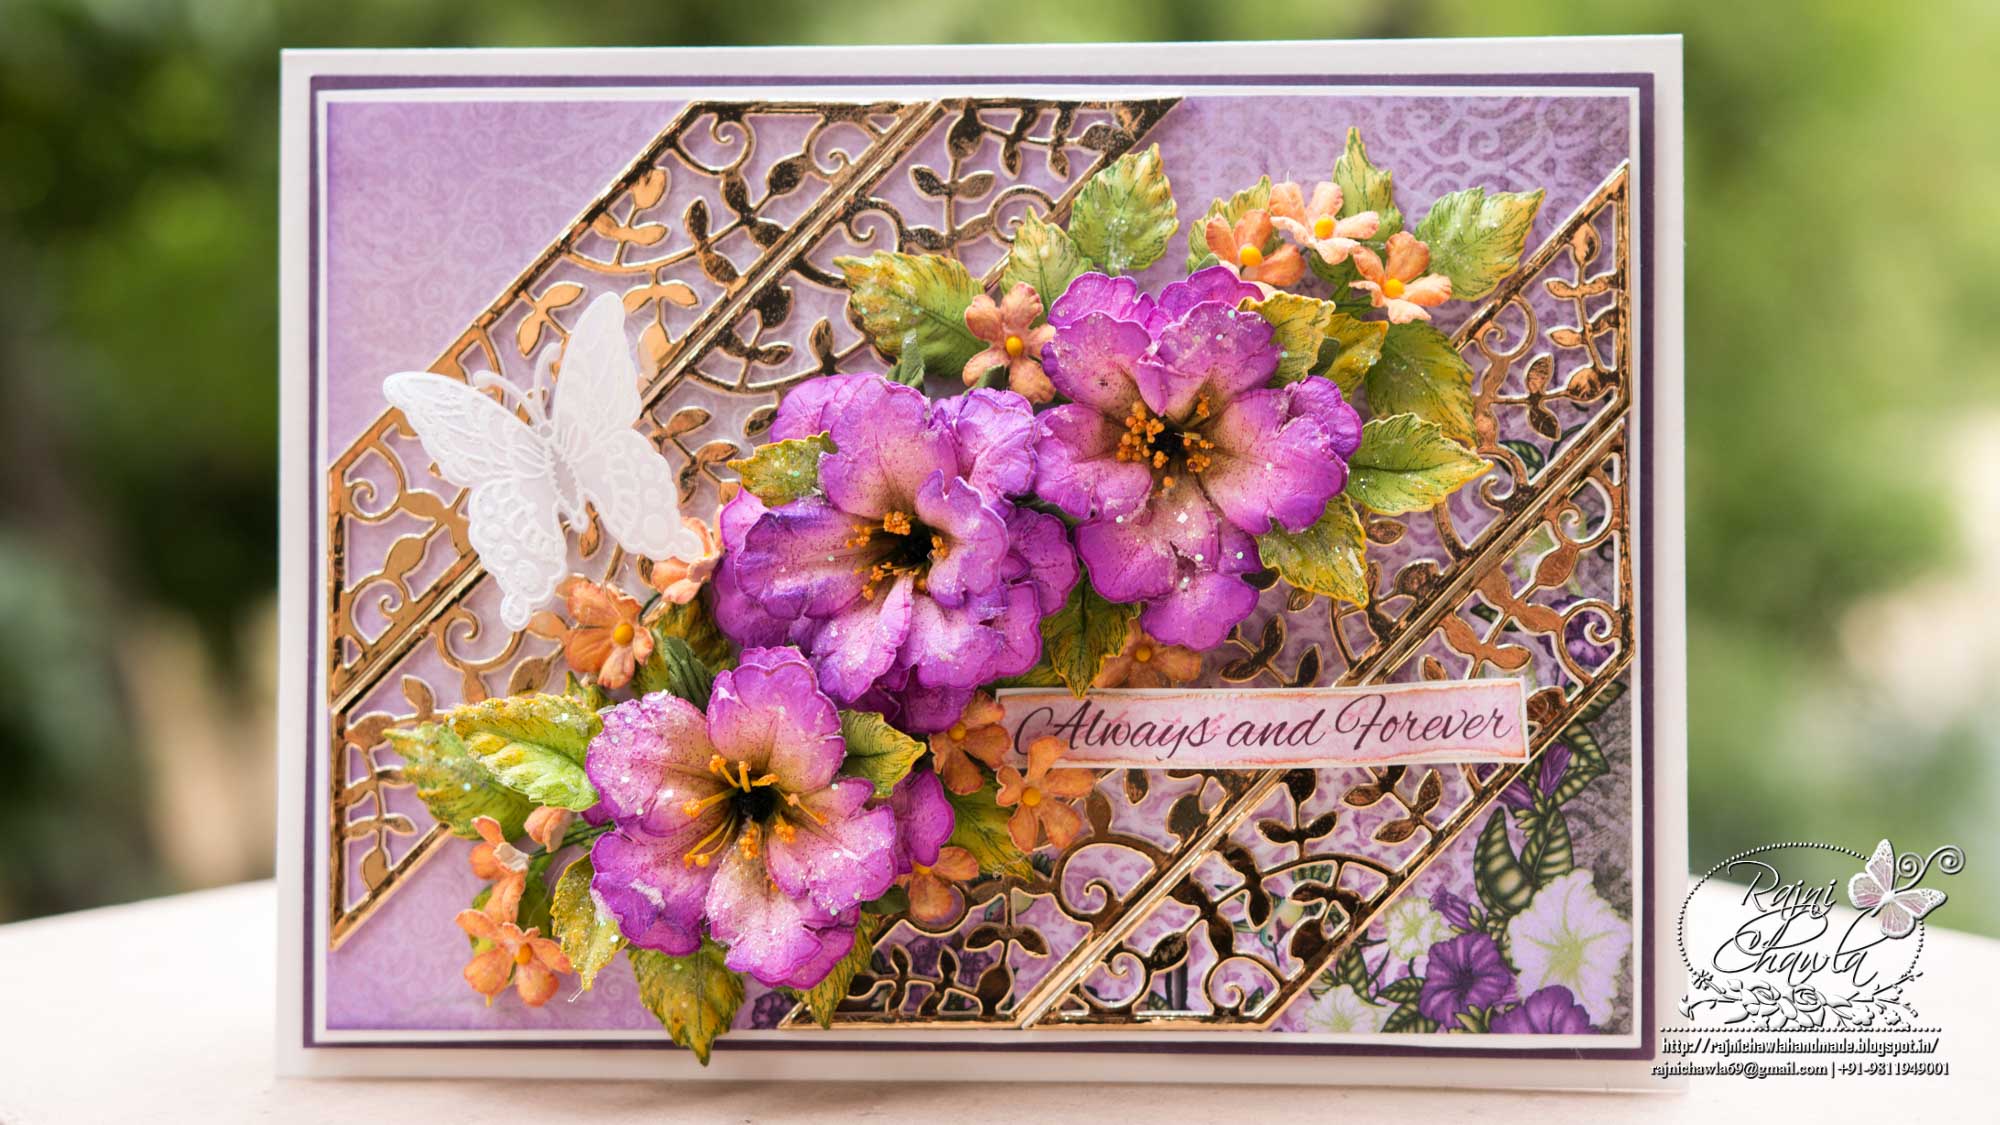
I have created a Petunia bouquet as a card focal image and used Frame a Card Leafy Borders Dies as an extra accents to the card base.
Supplies from Heartfelt Creations:
HCPC 3835 Leafy Accents Cling Stamp Set
HCD1-7193 Leafy Accents Die
HCFB1-467 3D Leafy Accents Shaping Mold
HCD1-7110 Classic Rose Die
HCPC-3752 Classic Rose Cling Stamp Set
HCD1-7140 Large Classic Petunia Die
HCPC-3786 Large Classic Petunia Cling Stamp Set
HCD1-787 Sunrise Lily Die
HCDP1-278 Classic Petunia Paper Collection
HCD1-759 Butterfly Medley Die
HCPC-3650 Butterfly Medley Cling Stamp Set
HCD2-7190 Frame a Card Leafy Borders Die
RACP985 Ranger Archival Ink Pad – Cactus Flower
RACP436 Ranger Archival Ink Pad – Leaf Green
RACP962 Ranger Archival Ink Pad – Fern Green
RACP663 Ranger Archival Ink Pad – Tea Rose
RACP614 Ranger Archival Ink Pad – Magenta Hue
RACP494 Ranger Archival Ink Pad – Majestic Violet
RACP475 Ranger Archival Ink Pad – Library Green
RACP005 Ranger Archival Ink Pad – Sunflower
HCS1-459-3 Assorted Bead Stamens-Medium
RAHT Heat It Craft Tool
HCDA2-450 Stack and Store Daubers-Pack of 30
PGM15015 Rajni Chawla’s Crystal Clear
ANC818 Go Man Go Prills
CB80 ColorBox Pigment Ink Pad – Frost White
RPEJ685 Embossing Powder – White
159723 Designer Dries Clear Adhesive
HCST1-401 Deluxe Flower Shaping Kit
Other Products Used: Golden Mirror Sheet, White smooth white cardstock, Purple color cardstock, Papericious Vellum, scoreboard, Glue Dots.
Videos Referred: For more tips on creating with the Frame a Card Leafy Borders, watch the tutorial at https://youtu.be/K_1152Kd2Ls.
To see how to shape the petunia, watch the video at https://youtu.be/KOy_qNB9OAk.
Instructions: The ready top-fold card base measures, 6″ by 8″. To prepare the card mats, first, choose a paper from the designer paper collection and cut a piece measuring 5 1/4″ by 71/4″. distress the edges using matching distress ink and layer it on a white cardstock, 1/16″ of an inch bigger on all the 4 sides. Further, layer it on a purple cardstock. again 1/16 ” of an inch larger on all the sides. Finally mat the panel on the ready card base.
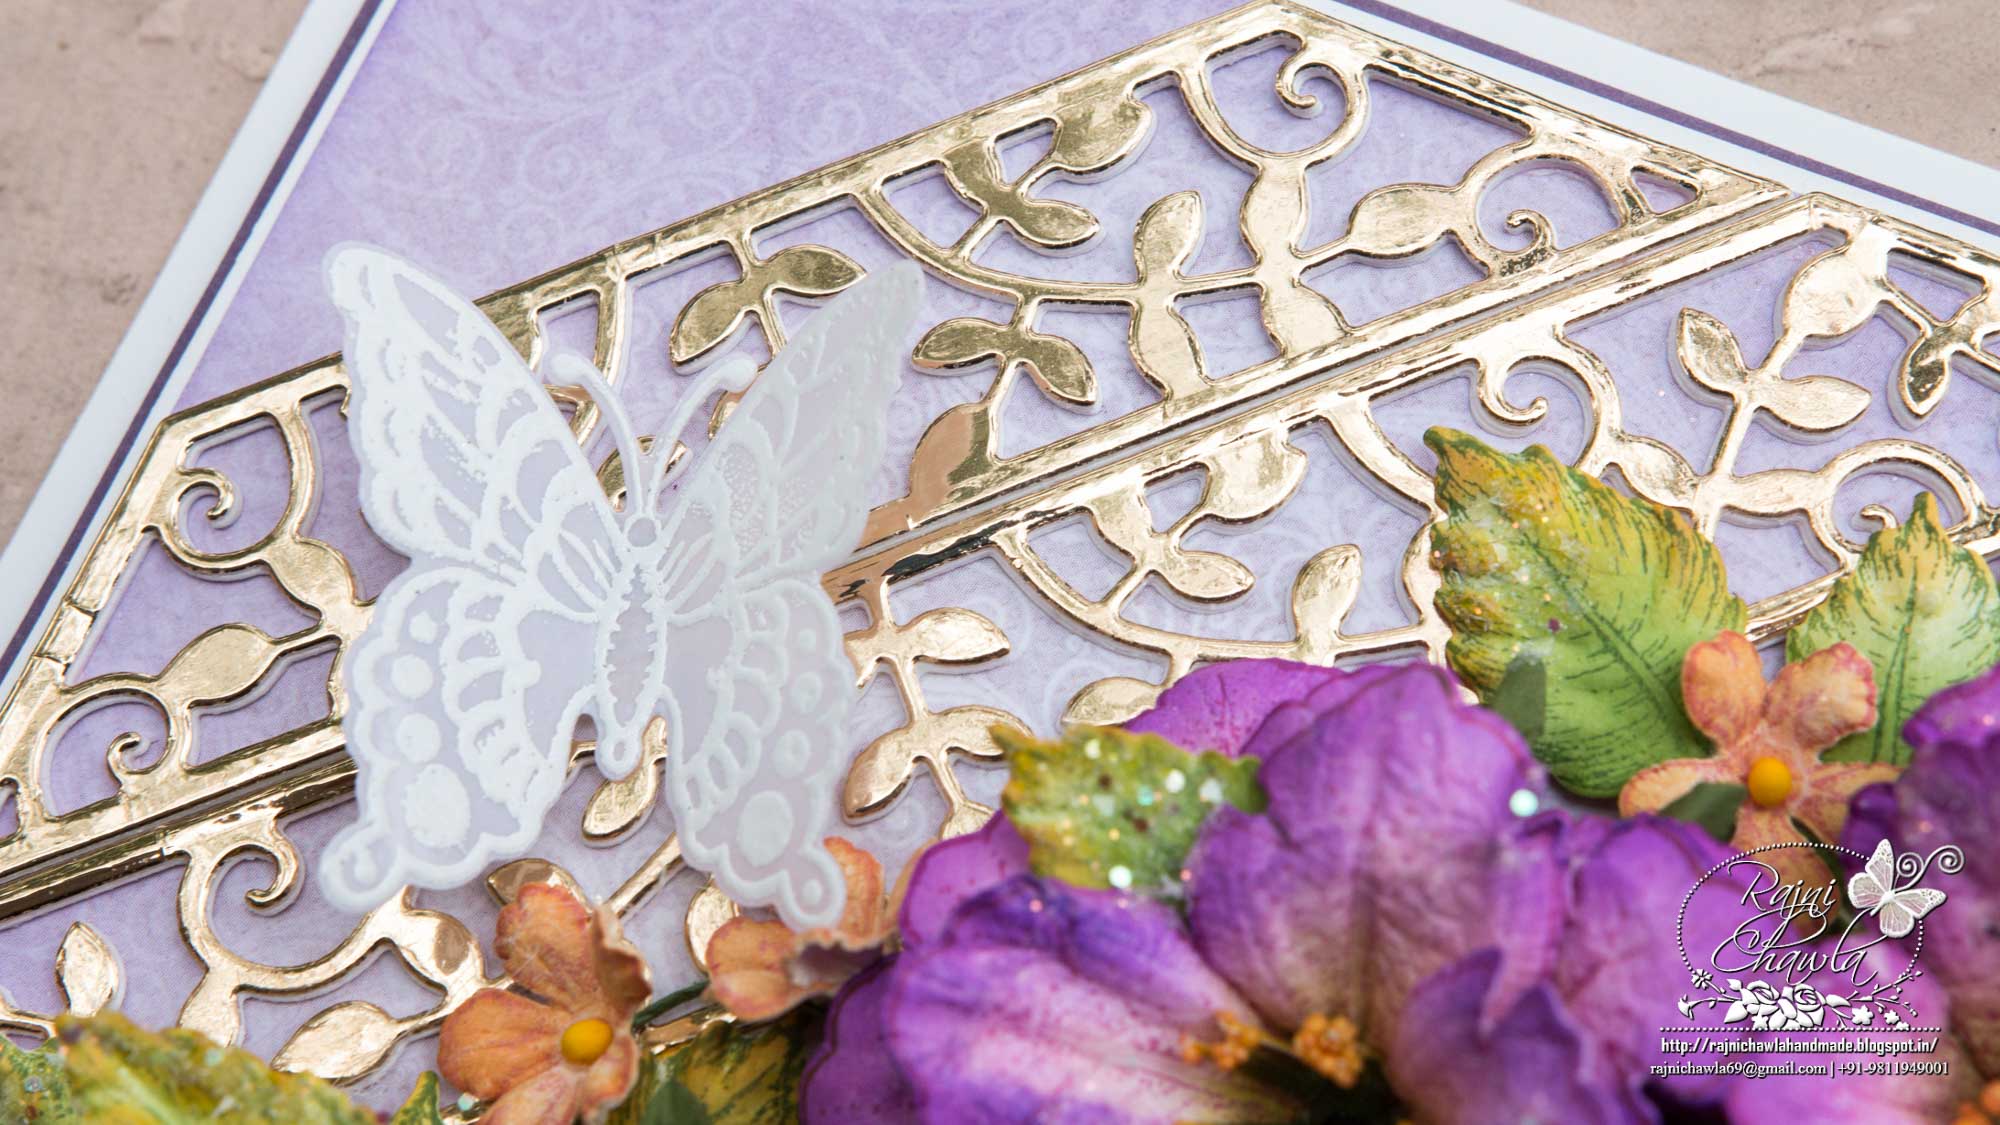
Using first 2 larger dies from Frame a Card Leafy Borders Die, cut 4 pieces each from white cardstock and 1 piece each from golden mirror sheet. Stack them together keeping 2 white on base and a golden on top. Prepare 2 of same kind using largest and 2 of the second largest die. Adhere them on the card panel as shown.
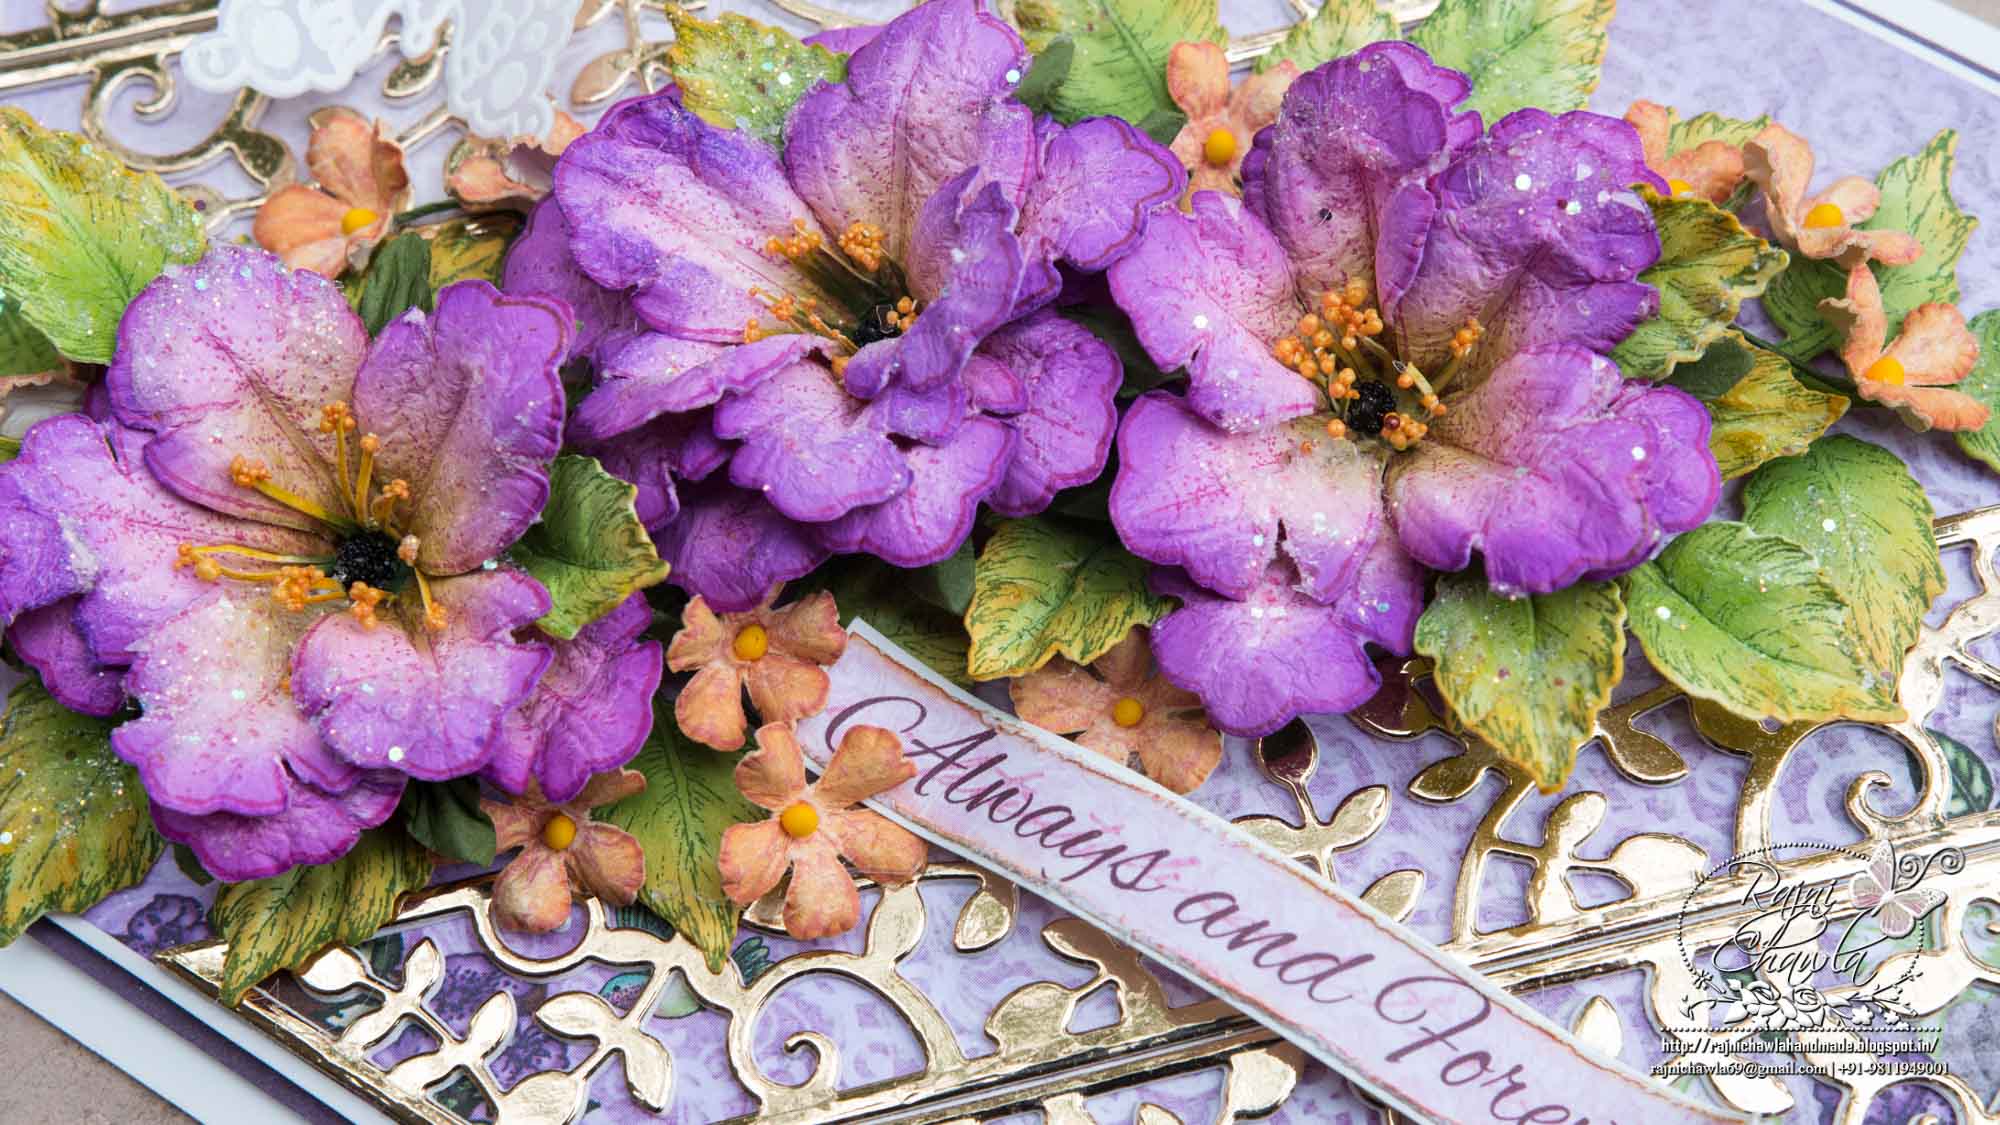
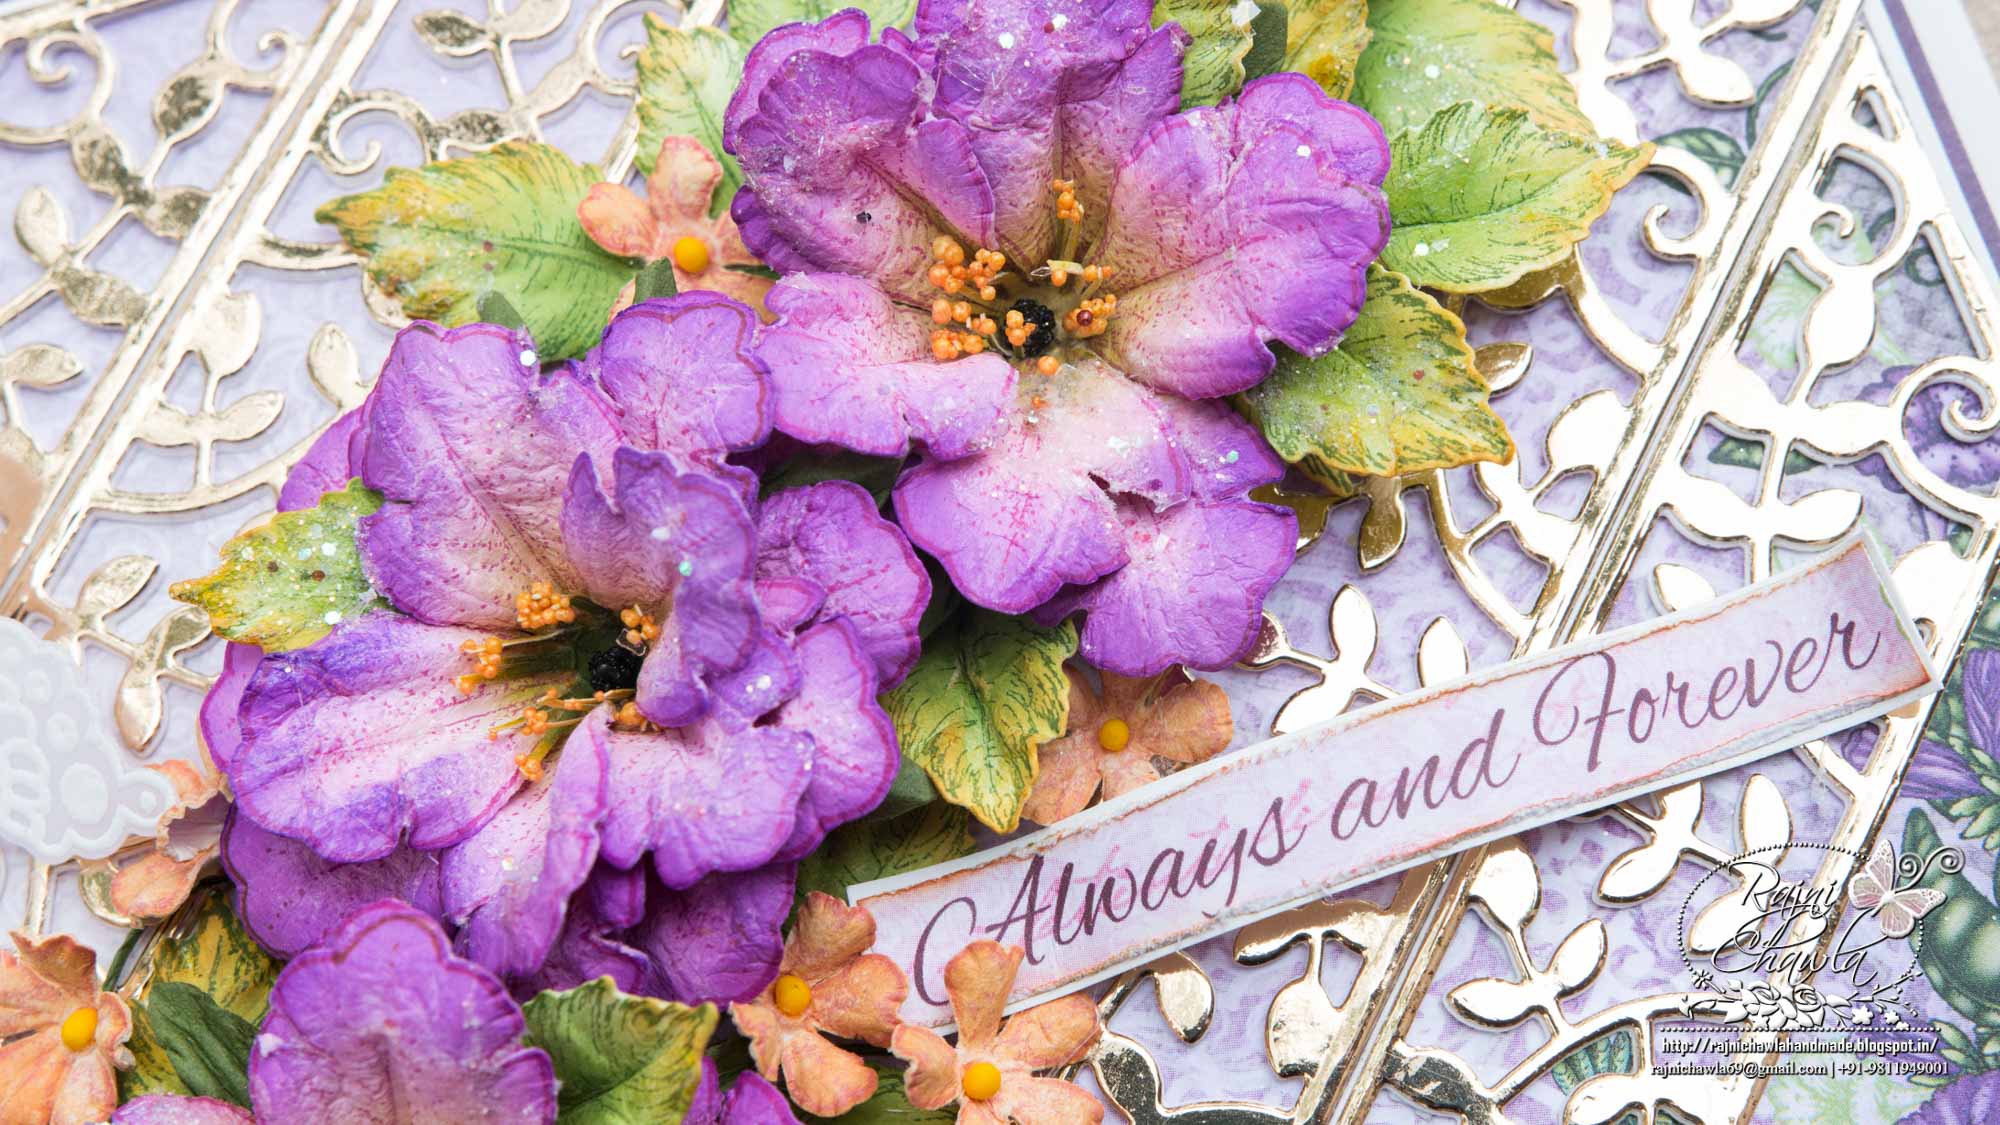
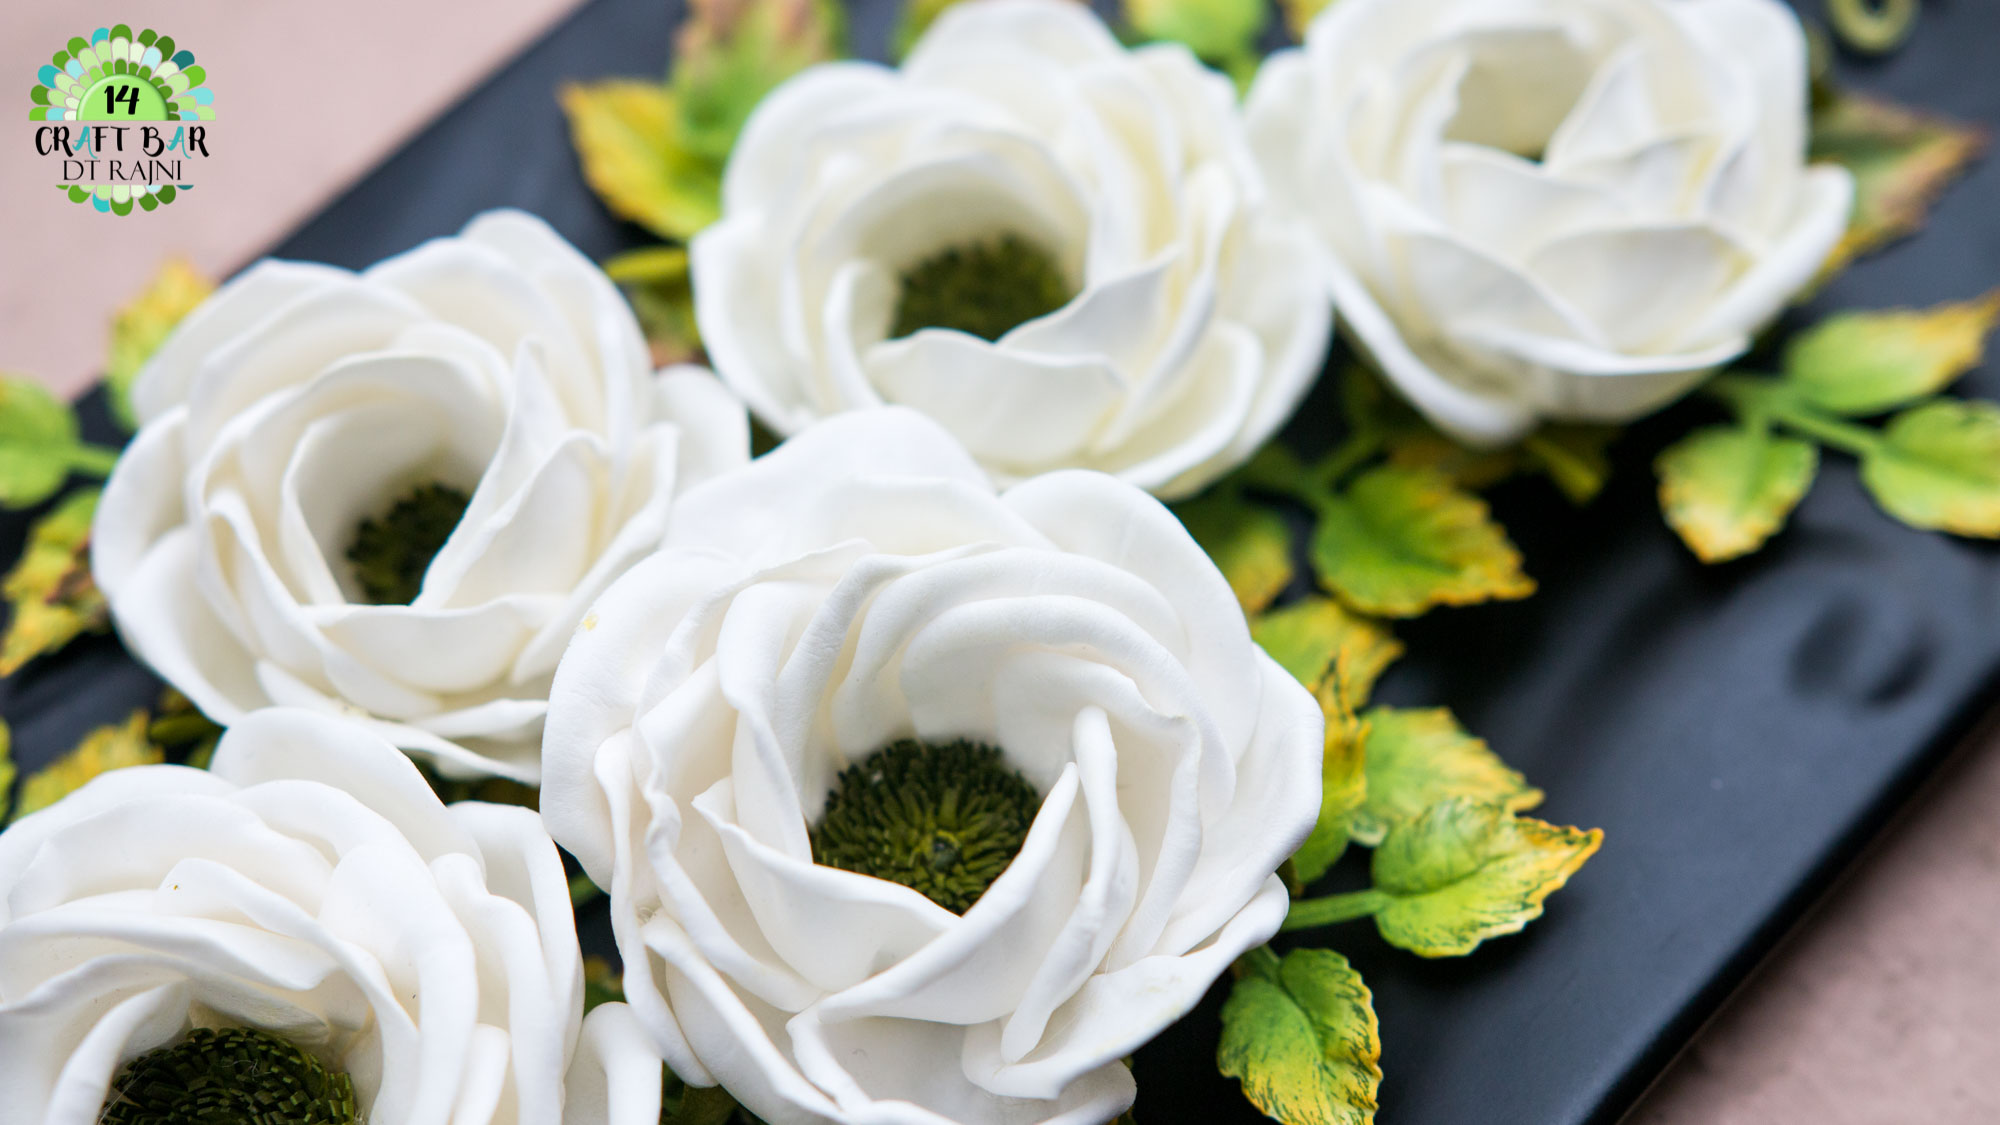
To Prepare the Petunias, check Emma’s video. (https://youtu.be/KOy_qNB9OAk.). Stamp total of 7 large petunias with Magenta Hue and cut them using their coordinating dies. Color the petunia centers with leaf green archival ink and color the edges with Cactus Flower. Further, highlight the edges with Majestic Violet. Shape the flowers using flower shaping kit. For the centers, cut the stamens from Sunrise Lily Die, paint them using Sunflower yellow archival and Leaf Green archival ink. Roll them between your fingers and add prills using an adhesive that dries clear. Adhere these stamens in the flower centers and press them hard to lift the flower petals. Prick the flower centers and add Black beaded stamen in the center. Cut the wire once the flower center is dry. Prepare 2 flowers using 2 petals and one flower using 3 petals.
For the filler flowers, the smallest flower from Classic Rose Cling Stamp set is stamped with Tea Rose and cut using it’s coordinating die. Paint the flowers using same ink and shape them using deluxe flower shaping kit.
For leaves, images from Leafy Accents Cling Stamp Set are stamped with Library Green, cut them using its coordinating die and colored them using Leaf Green and Fern Green. Shape the leaves using its coordinating mold. Once shaped and dried, highlight the leaves using Sunflower ink, very softly.
For the Butterfly, stamp the image on vellum sheet using colorbox white ink and sprinkle white heat embossing powder. Dust extras and heat set it with the help of heat gun. Now cut the image using its coordinating die. Once all the elements are ready, assemble the card as shown and finish the card with a sentiment from the paper collection.
This is simply gorgeous my friend. I love how you used the frame a card dies under all those lovely flowers and leaves!
Wow Rajni, this is sooo beautiful! Love how you used the dies and your flowers are absolutely breathtaking! I love the colors! Your are simply amazing!
Just beautiful – your flowers are stunning and I love how you have used the Leafy Borders as well!