


Good morning all…
Welcome again to inspiration Wednesday for Heartfelt Creation. CAS is not my style of working. Cards without flowers and less detailing are little more difficult to create for me. For Christmas, we need to create lots more cards for our dear ones. So tried to do little simple this time. Hope you like them.
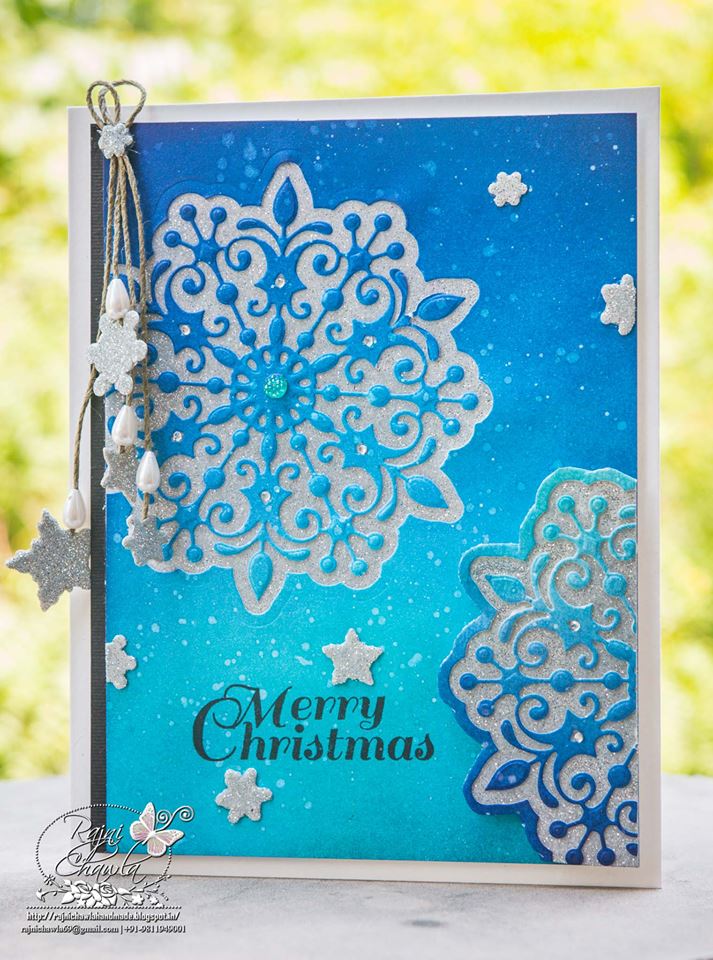
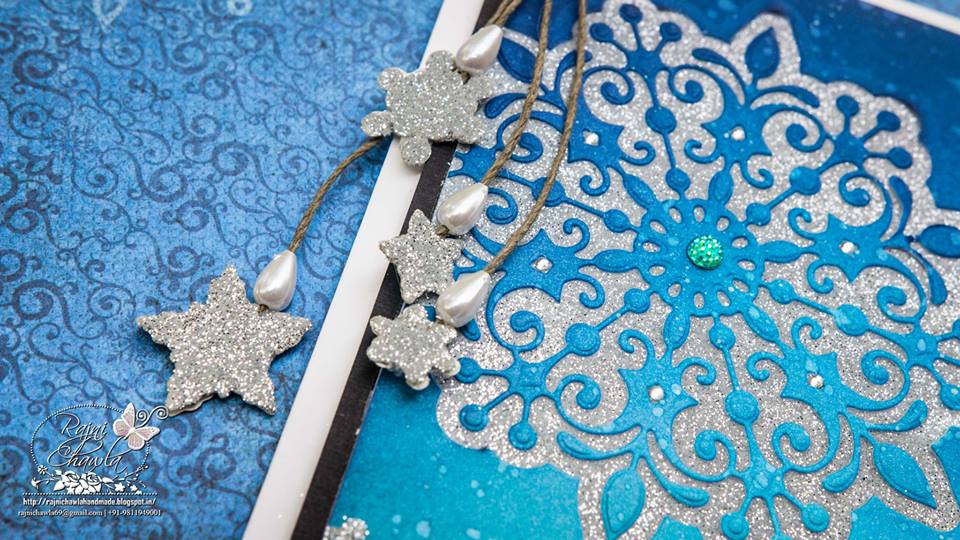
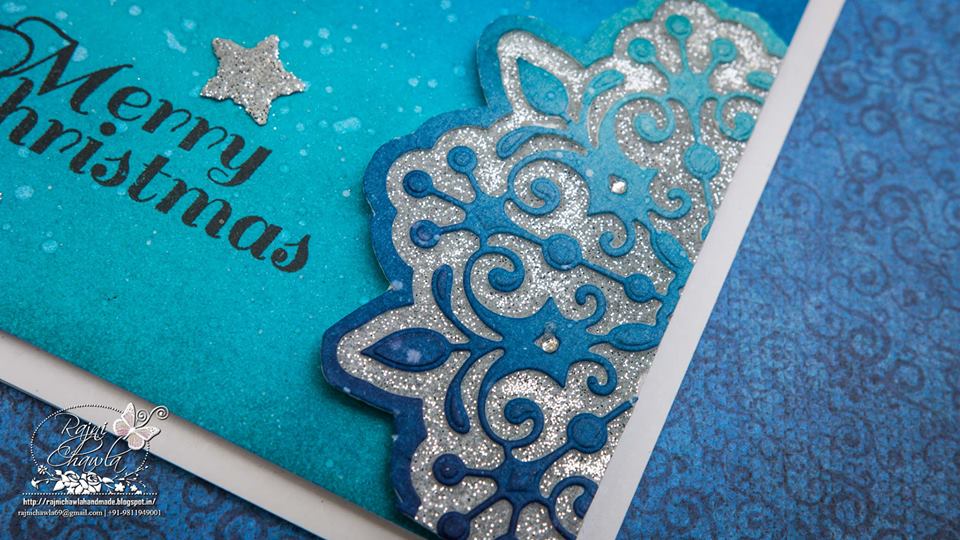
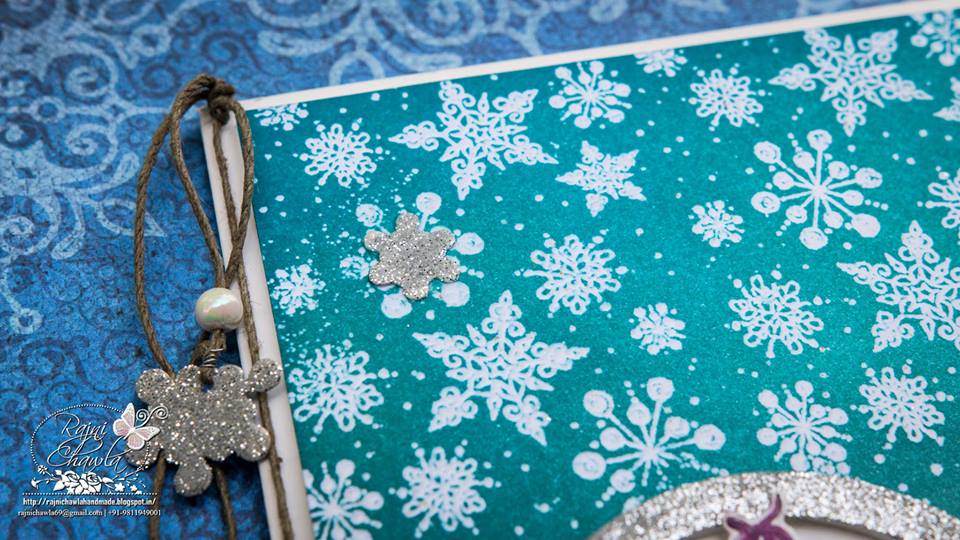
Card1 : Glittered Snowflakes
Products from Heartfelt Creations:
Gift Wrapped Presents Cling Stamp Set HCPC-3748
Snow Kissed Flakes and Tag Die HCD1-7108
Double Dots 100pc. -3D Foam Circles DDOTS
Other Products Used: Silver glitter, Black Archival ink, die cutting machine, distress ink peacock Feather, Seedless Preserves, and Salty Ocean, Sticker sheet, twine and few drop shaped white beads.
Instructions: Ready side open card measures 5” by 7”. Cut a smooth white card stock. measuring 4 1/2″ by 6 1/2 ” for the front panel. Start inking the panel with Salty Ocean from the base, Peacock Feather in the middle, and Seedless Preserves on the top. Tape the Snowflake Kissed die on the left side of the panel and run through a die-cutting machine. Take out the outer ring of the snowflake and reserve it for next use.and release rest of the snowflake from the die. Discard all negative pieces and fix the die cut inside the die again and keep aside. Now take another white panel of same size and stick a sticker sheet. Peel off the sticker sheet and release its second release paper and stick directly under the negative ( inked panel) of the die cut. Now set the die on the empty sticky place. Lift the die and press smoothly using releasing paper that was left from the sticker sheet. Add silver glitter to all empty spaces. Dust the panel and remove extra glitter. For the half snowflake, ink another piece of card stock the same way and die cut. This time keep the outer ring
For the half snowflake, ink another piece of card stock the same way and die cut. This time keep the outer ring aswell. Discard all negatives from the die cut and fix it back again into the die. Stick a sticker sheet on another white card stock and release the second release paper. Keeping the sticking side facing up, put the die cut on top along with the die and press. Lift the die now. Burnish the die cut smoothly using the releasing paper left from the sticker sheet. Fussy cut it, trim it into half and layer it on the right side of the panel using glue dots. To add little more decoration, transfer the sticker sheet on white cardstock and using small star dies run it through die cutting machine. Remove the releasing paper and add glitter. Burnish the glitter with fingers for extra shine. Glue them using the adhesive that dries clear. The sentiment is stamped with black archival ink and is from Gift Wrapped Presents Cling Stamp Set. layer the panel on the card base and add twine to add more interest.
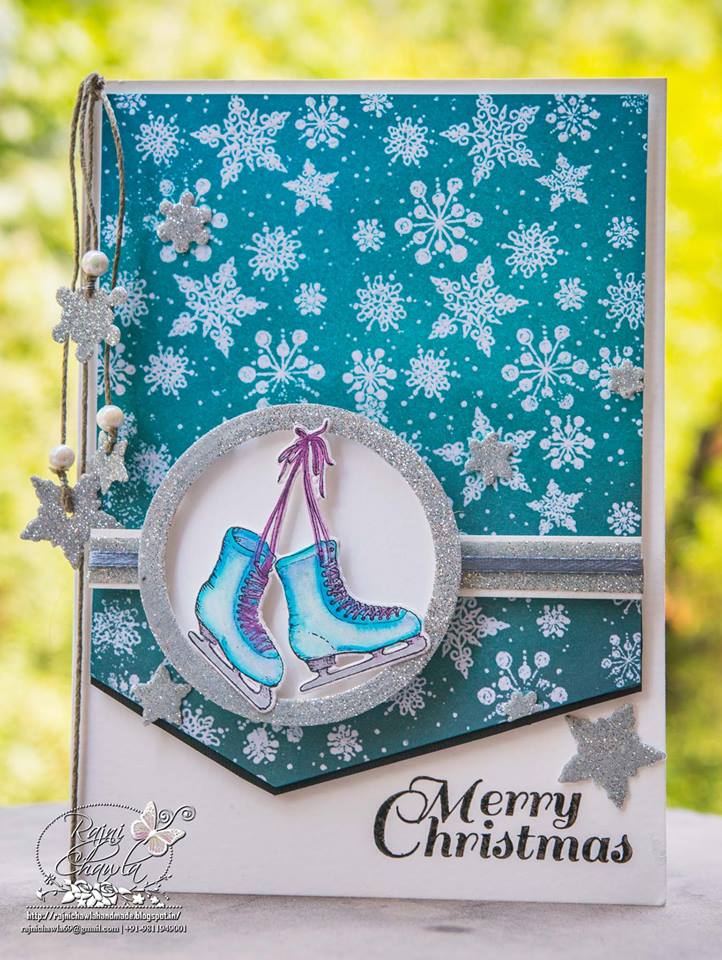
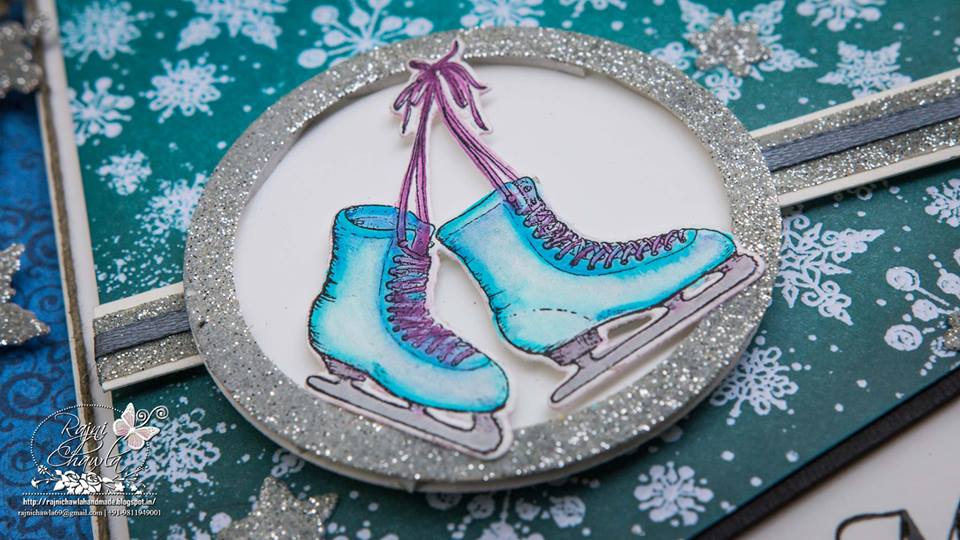
CARD 2: Chrismas Skates and snowflakes
Products from Heartfelt Creations:
Gift Wrapped Presents Cling Stamp Set HCPC-3748
Celebrate the Season Cling Stamp Set HCPC-3747
Celebrate the Season Die HCD1-7106
Snow Kissed Flakes and Tag Cling Stamp Set HCPC-3751
Snow Kissed Flakes and Tag Die HCD1-7108
Designer Dries Clear Adhesive 159723
Double Dots 100pc. -3D Foam Circles DDOTS
Other Products Used: Clear heat embossing powder, Versamark ink, Black archival ink, Salty Ocean, Seedless Preserves and Hickory Smoke distress inks, silver glitter, white card stock Classic circle die
Instructions: Ready Card measures 5 ” by 7″. For front panel take 4 1/2″ by 6 1/2″ white card stock and stamp with Versamark ink. Add clear embossing powder and heat set. Ink it using Salty Ocean, Seedless Preserves, and Hickory Smoke distress inks.Trim it as shown and mat it on a black card stock on the base. Layer the panel on the card base. Cut a strip 1/4 ” by 6 1/2″ long from white card stock add stick a red tacky tape 1/8″ in the centre. Release the red sticker and add glitter. Burnish it with fingers for extra shine and dust extra. Layer the strip as shown using glue dots. Take white card stock and transfer sticker sheet. Run it through die cutting machine and cut a frame from the same using Spellbinder’s Classic Circle die. Remove the releasing paper and add glitter. Burnish it with your fingers for extra shine and dust extra. Layer the frame on the circle die cut using dimensional tape. The skates are stamped using Black Archival Ink and painted using Zig Clear brush pens. The image is then cut using its coordinating die and layered using glue dots. The sentiment is from Gift Wrapped Presents Cling Stamp Set. To add extra interests add few glittered stars and add glittered tassels with twine as shown.
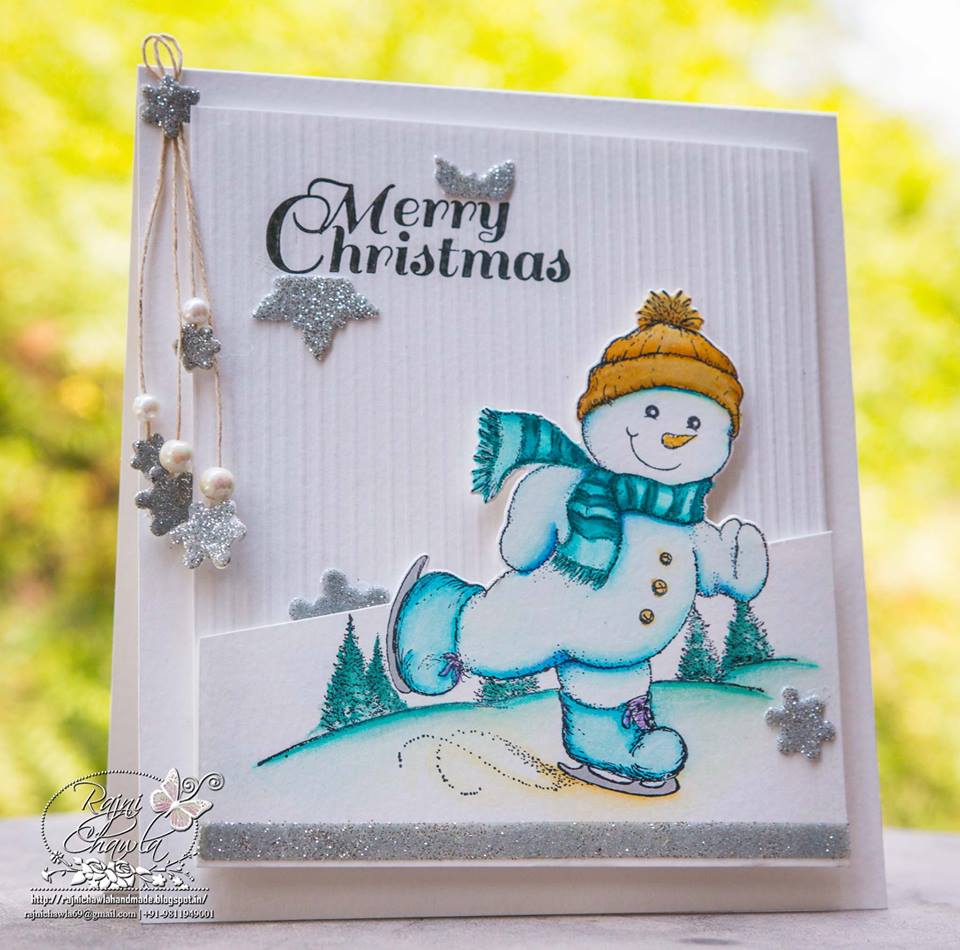
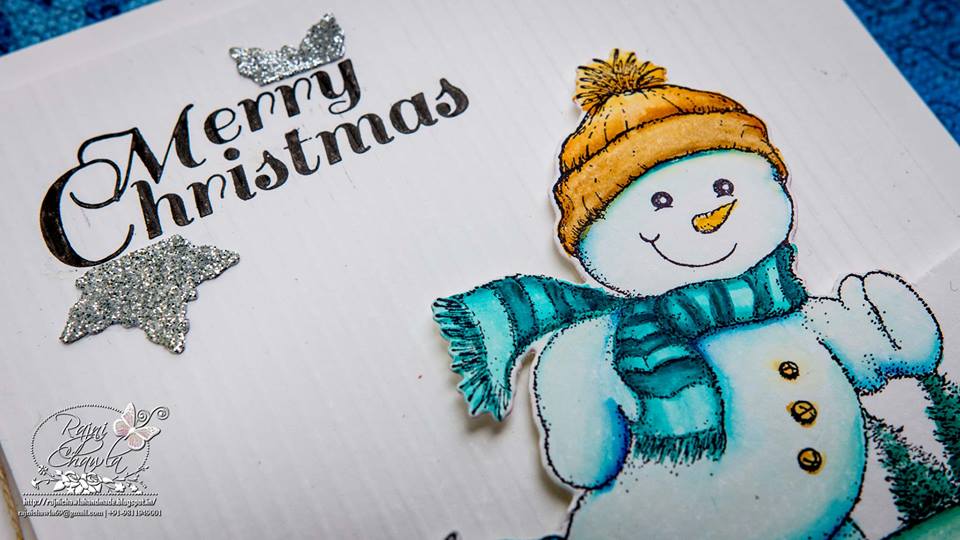
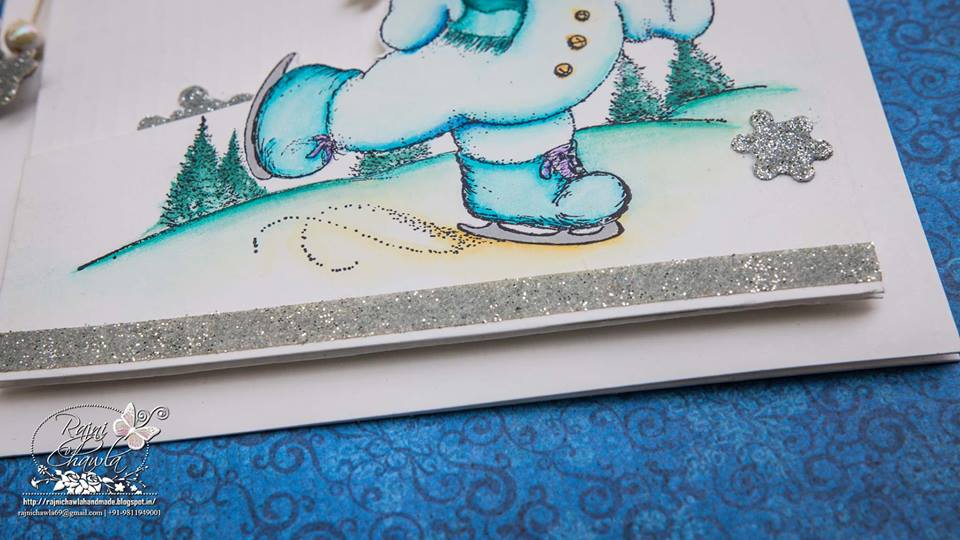
Card 3: Partial die cut Snowman
Products from Heartfelt Creations :
Frolicking Frosty Cling Stamp Set HCPC-3750
Frolicking Frosty and Spruce Die HCD1-7107
Snow Kissed Flakes and Tag Die HCD1-7108
Designer Dries Clear Adhesive 159723
Double Dots 100pc. -3D Foam Circles DDOTS
Other Products Used: Black Archival ink, Zig Clean clear brush pens, scoring board , koi brush, sticker sheet, white card stock, twine, and beads.
Instructions: The finished card measures 5 1/2 ” by 6 1/2″. cut a front panel of 5 ” by 6 ” from white card stock. Stamp the sentiment using black archival ink and wait till dry. Score the whole panel at 1/8″. Cut another piece from white card stock and stamp the snowman with black archival ink. Paint the image using Zig clean clear brush pens. Partial cut the image using its coordinating die and layer it on front panel using glue dots. Add a strip of tacky tape and remove releasing paper. Sprinkle silver glitter and dust extra. For extra interests add glittered stars and add tassels as shown.
Wow!! Amazing cards ma’am! I’m in love with the first card, those blue shades and bg are just perfect <3
Your projects are just lovely! Love your coloring on the snowman!